Two-phase registration, consisting of initial signup followed by a confirmation/activation email is a common piece for any web app. In this article I will guide you through setting this up in Django using the Django-registration plugin and Gmail for messaging. Then I show you how to deploy the app to Heroku.
I built the first iteration for Code Challenge 29 – Create a Simple Django App:
I created a Django registration / login system using django-registration and gmail. … What’s cool about it is that I can re-use this code for other new projects where this functionality is often required. I will do an article this week detailing some of the challenges I had to get this working …
Well, here we go …
The plan
This serves as the tutorial I wanted to have when I got started. You will probably save time too, because I ran into various issues which I ironed out in the steps below.
An earlier iteration is on Github, but I will build it again from scratch so we can see it step-by-step and Julian can test it out for himself (thanks buddy!)
Getting ready
First we create a virtual env and install Django, Django-registration and the other plugins we will use. If you want to use SQLite you can leave psycopg2 out. If you want to follow along now is a good time to fire up your terminal!
$ mkdir registration && cd $_
$ python3 -m venv venv && source venv/bin/activate
(venv) $ pip install django django-registration dj-database-url gunicorn psycopg2
...

(venv) $ pip freeze
dj-database-url==0.4.2
Django==1.11.4
django-registration==2.2
gunicorn==19.7.1
psycopg2==2.7.3
pytz==2017.2
Let’s create our Django project
(venv) $ django-admin.py startproject register
# (cannot use dir name 'registration')
When I talk about project toplevel or root dir I mean this outer register directory. It’s where manage.py lives:
(venv) $ ls register/
manage.py    register
If I talk about the main app I mean this directory:
(venv) $ ls register/register/
__init__.py    settings.py    urls.py        wsgi.py
It’s where Django’s config or settings.py lives and it’s the main app we use to set up main view, urls and template. There won’t be much coding though because Django-registration abstracts a lot away for us. Most effort will go into setup and configuration.
By the way, the Django directory / file structure can be quite confusing when you are getting started. Maybe good to wrap this in another short article and/or touch upon it when we’ll look at Cookiecutter Django …
Sanity check
You should be able to run Django now:
$ cd register
$ python manage.py runserver
Navigate to http://127.0.0.1:8000/ – you should see Django’s It worked! page. It also says You have 13 unapplied migration(s). – we get to that later in the Migration section.
If you want to use Postgres like me now is a good time to create the database. If you want to use SQLite you can skip this step.
(venv) $ psql
bbelderb=# create database notifications;
bbelderb=# \c notifications
You are now connected to database "notifications" as user "bbelderb".
We call it notifications because
Messaging
I will use Gmail here but you could also use a service like Heroku’s SendGrid. This is probably better in the long run because to have Gmail working on Heroku you have to relinquish security:
-
you have to enable this setting to allow emailing from someplace other than gmail;
-
that worked for localhost, for Heroku though I had to DisplayUnlockCaptcha when I started mailing (testing first signup). See here for more information.
So I recommend you create a separate gmail account if you go this route.
Environment variables
We need some env variables. I set those in this virtual env so they are bound to this app (Zen: namespaces are a honking great idea, right?):
At the end of venv/bin/activate:
export SECRET_KEY=some_large_random_string  -> get it from Django's settings.py or generate one yourself
export DJANGO_ENV='local'
export GMAIL_SMTP_USER='new_gmail_account'
export GMAIL_SMTP_PASSWORD='gmail_pw_of_this_account'
export DB_NAME='notifications'
export DB_USER='pbcl'
export DB_PW='your_password'
If you want to use SQLite you can omit the DB_* variables.
Make sure you re-activate your venv so these variables become active:
(venv) $ deactivate
$ source venv/bin/activate
Last command is convenient to have in your .bashrc (assuming you always have your virtual env in your project folder naming it venv):
alias ae='source venv/bin/activate'
Configuring Django
Let’s set up Django’s configuration that lives at register/register/settings.py (from venv dir). Some of this is early encapsulation and required/recommended config for later deployment to Heroku. Please bare with me.
-
Locate the
SECRET_KEYvariable, delete it and add your own, also let Django know in what environment we are:SECRET_KEY = os.getenv('SECRET_KEY') DJANGO_ENV = os.getenv('DJANGO_ENV', 'production').lower() -
Now using the newly Django env variable let’s delete the
DEBUGvariable and set it based on env with the snippet below. We will use Heroku later to deploy the app so let’s add that toALLOWED_HOSTS(and limit the catch-all*to local env only):if DJANGO_ENV == 'local': DEBUG = True ALLOWED_HOSTS = ['*'] else: DEBUG = False ALLOWED_HOSTS = ['.herokuapp.com']Making these two changes addresses the two ‘SECURITY WARNING’ comments in
settings.py. -
Using the django-registration no additions are needed to
INSTALLED_APPSandMIDDLEWARE, that all works out-of-the-box with Django-registration. -
Templates directories: update the DIRS list in
TEMPLATESso Django knows where to look for templates:... TEMPLATES = [ ... 'DIRS': [ os.path.join(BASE_DIR, 'templates'), os.path.join(BASE_DIR, 'register', 'templates'), ], ...We will create the actual directories on the file system when we’re done with
settings.py. -
Database config: we load in the env variables for our local use. For production (Heroku) we use
dj_database_url. This is for A. Postgres, for SQLite use B.:A. Postgres
DATABASES = {
    'default': {
        'ENGINE': 'django.db.backends.postgresql_psycopg2',
        'NAME': os.getenv('DB_NAME'),
        'USER': os.getenv('DB_USER'),
        'PASSWORD': os.getenv('DB_PW'),
        'HOST': os.getenv('DB_HOST', 'localhost'),
        'PORT': os.getenv('DB_PORT', '5432'),
    }
}

if DJANGO_ENV == 'production':
    import dj_database_url
    db_from_env = dj_database_url.config(conn_max_age=500)
    DATABASES['default'].update(db_from_env)
B. SQLite = default setting changing the name of the DB:
DATABASES = { 'default': { 'ENGINE': 'django.db.backends.sqlite3', 'NAME': os.path.join(BASE_DIR, 'notifications.sqlite3'), } } -
Static files are still confusing at times for me but this is the recommended setting for Heroku that worked for me. Put it at the end of
settings.py:PROJECT_ROOT = os.path.dirname(os.path.abspath(__file__)) STATIC_ROOT = os.path.join(PROJECT_ROOT, 'staticfiles') STATIC_URL = '/static/' # Extra places for collectstatic to find static files. STATICFILES_DIRS = ( os.path.join(PROJECT_ROOT, 'static'), )Three more settings to go …
-
Add the Django-registration setting to limit activation of accounts from the validation email to 7 days:
ACCOUNT_ACTIVATION_DAYS = 7 -
Set the email config, assuming you’re using Gmail like me:
EMAIL_HOST = 'smtp.gmail.com'
EMAIL_PORT = 587
EMAIL_USE_TLS = True
EMAIL_HOST_USER = os.getenv('GMAIL_SMTP_USER')
EMAIL_HOST_PASSWORD = os.getenv('GMAIL_SMTP_PASSWORD')
Note we need port 587 for gmail, see here.
-
And lastly with
DEBUGset to False in Production (Heroku), if anything blows up we only see a useless 500 error. I found this setting which sends errors to Heroku’s log. You can then easily debug anything pulling the remote logs with Heroku CLI’sheroku logcommand. Add this snippet tosettings.py:LOGGING = { 'version': 1, 'disable_existing_loggers': False, 'handlers': { 'console': { 'class': 'logging.StreamHandler', }, }, 'loggers': { 'django': { 'handlers': ['console'], 'level': os.getenv('DJANGO_LOG_LEVEL', 'ERROR'), }, }, }
If you’re lost at this point the complete settings file is here.
Remember that we updated TEMPLATES settings under 4.? Let’s create these directories. They will hold static and template files.
# just to make sure:
(venv) $ pwd
./registration/register

(venv) $ mkdir templates
(venv) $ mkdir register/templates
(venv) $ mkdir register/static
I am making two templates directories to use template inheritance: the upper templates dir will host a base.html we will extend from and the templates associated with the Django-registration plugin we will download in a bit.
DB migration
As we saw before when we started Django’s webserver the data was not yet loaded in. Let’s do that now:
$ python manage.py migrate
Operations to perform:
    Apply all migrations: admin, auth, contenttypes, sessions
...
Let’s also create a superuser to be able to manage users that sign up:
$ python manage.py createsuperuser
...
Base template and static files
Create a base.html inside ./registration/register/templates/ with the following content:
        PyBites Django-registration Tutorial
        {% load static %}


        {% block title %}{% endblock %}

            {% if user.is_authenticated %}
                Hey {{ user.username }}, logout
            {% else %}
                Hello guest,  login (register)
            {% endif %}


        {% block content %}
        {% endblock %}
If you want to add your own CSS styles on top of Purecss create a style.css inside the register/static/ folder.
Here is a bare minimum to use Google fonts and align the login div:
(venv) $ cat register/register/static/style.css
body {
    background-color: #fff;
    width: 800px;
    margin: 0 auto;
    font-family: 'Open Sans', sans-serif;
}
form {
    margin: 20px 0;
}
#login {
    border-bottom: 1px solid #ddd;
    padding-bottom: 10px;
    margin-bottom: 10px;
    text-align: right;
}
Django-registration templates
Unfortunately the required templates are not included in Django-registration when pip installing it. What I ended up doing was grabbing them from django-registration-templates. However I made some wording and styling (purecss) changes to them and one template – password_reset_email.txt – was missing from that set, which caused the password reset page to crash. So grab my copy instead:
# you should be here:
(venv) $ pwd
./registration/register

# grab them from the GH repo in case I make further changes:
(venv) $ git clone https://github.com/pybites/django-registration ~/Downloads/registration-templates
...

(venv) $ cp -r  ~/Downloads/registration-templates/templates/registration templates/
(venv) $ ls templates/
base.html    registration
Write some Django code
OK with all this setup in place (sorry) let’s actually write some code. The good news is that Django-registration requires very little of it.
URL routing
cd into the main app (./registration/register/register):
(venv) $ cd register/
Replace the content of urls.py with the following code:
from django.conf.urls import url, include
from django.contrib import admin
from django.conf import settings
from django.views.static import serve

from . import views

urlpatterns = [
    url(r'^$', views.index, name='index'),
    url(r'^admin/', admin.site.urls),
    url(r'^accounts/', include('registration.backends.hmac.urls')),
]

if not settings.DEBUG:
    urlpatterns += [
        url(r'^static/(?P.*)$', serve, {
            'document_root': settings.STATIC_ROOT,
        }),
    ]
The accounts regex entry is required for the Django-registration plugin (we’re using the recommended two-phase or hmac-workflow). The admin route is to manage the signed up users via Django’s builtin admin.
I needed the last if not block to get static files working on Heroku, see here and here.
Next time I probably consider using a service like Whitenoise which should make this easier.
Homepage
Let’s add a simple index view to greet the guest or logged in user and provide a link to sign up. Still in the register/ main app, create a file called views.py and add the following code:
from django.http import HttpResponse
from django.template import loader

def index(request):
    template = loader.get_template('index.html')
    context = {}
    return HttpResponse(template.render(context, request))
It points to an HTML template called index.html. Let’s create this next. Still inside the inner register app folder, create this file inside register/templates/:
{% extends 'base.html' %}
{% block content %}
{% if user.is_authenticated %}
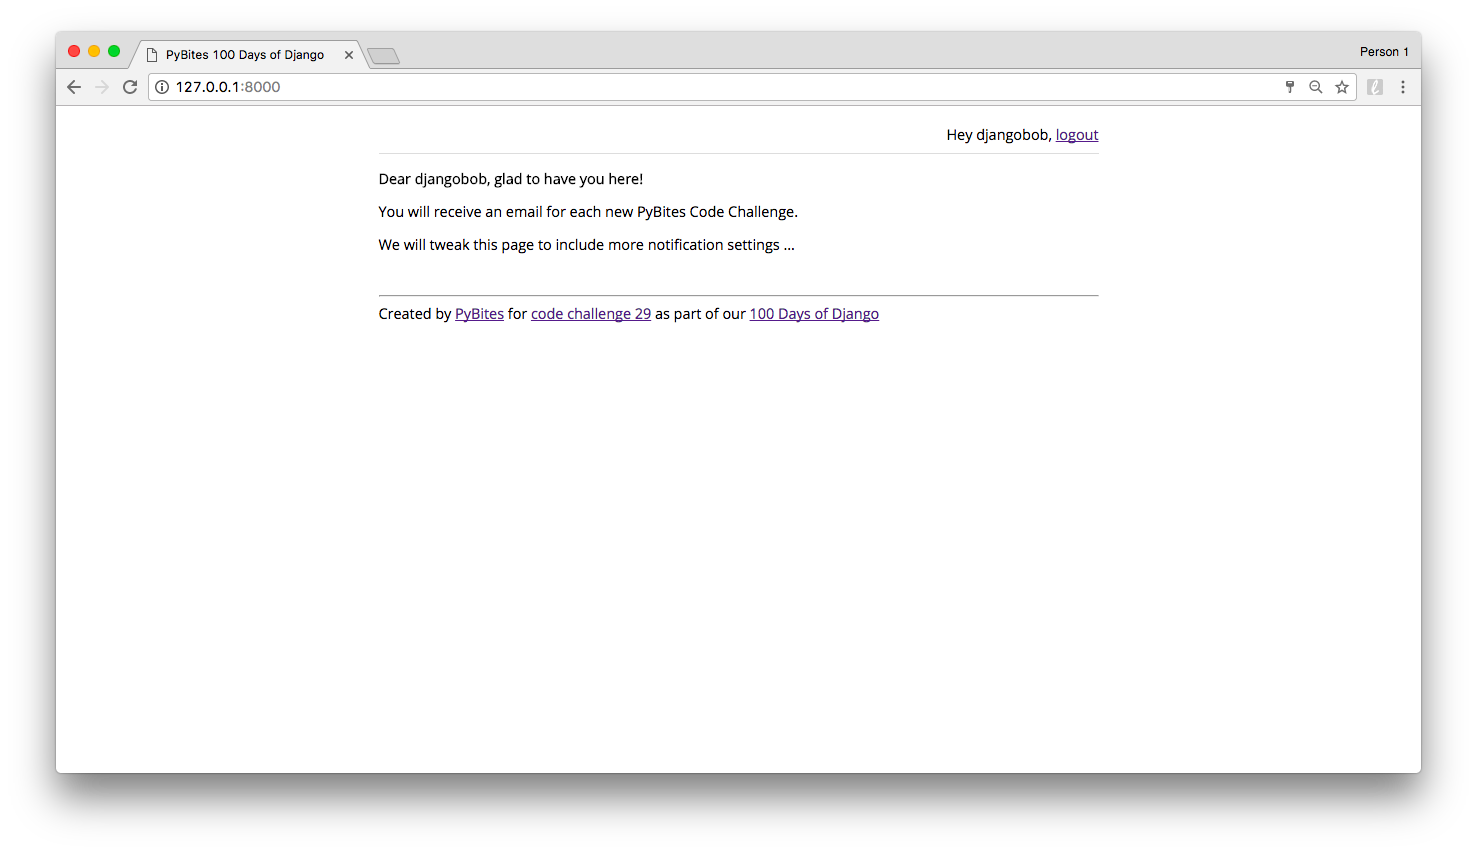
Dear {{ user.username }}, glad to have you here!
You will receive an email for each new PyBites Code Challenge.
We will tweak this page to include more notification settings ...
{% else %}
You can sign up here to get a notification email for each new challenge
{% endif %}
{% endblock %}
Here we extend the base.html template in the root templates folder. The TEMPLATES -> DIR list we updated earlier in settings.py makes this magically work. We check if the user is authenticated and message/link accordingly.
Let’s collect static files into STATIC_ROOT using collectstatic:
(venv) $ cd ..
(venv) $ python manage.py collectstatic
And run the app:
(venv) $ python manage.py runserver
You should see this:
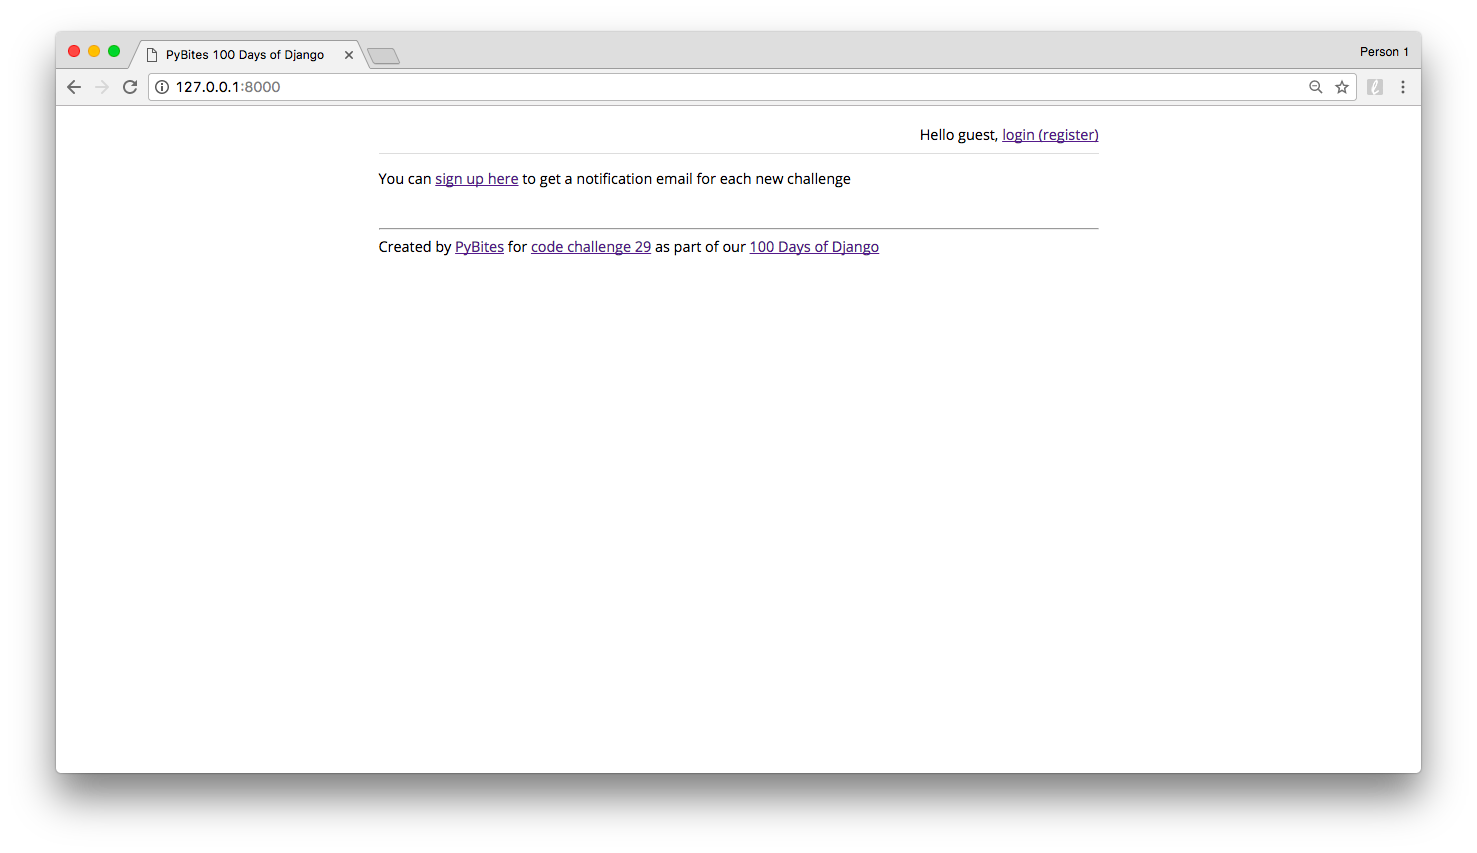
Click on the sign up here link, you should see a sign up form. One thing that does not seem right is the validation messages being visible all the time. I will fix and post here …

Enter your username, email and password and click Submit:
If all is setup correctly (env vars, gmail prep) You should get an email:
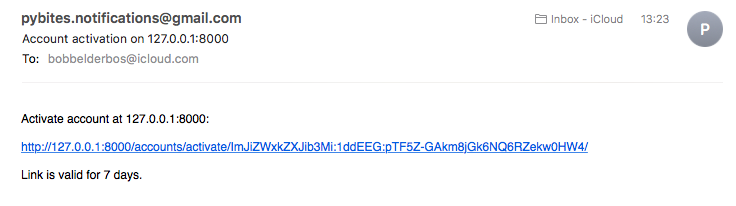
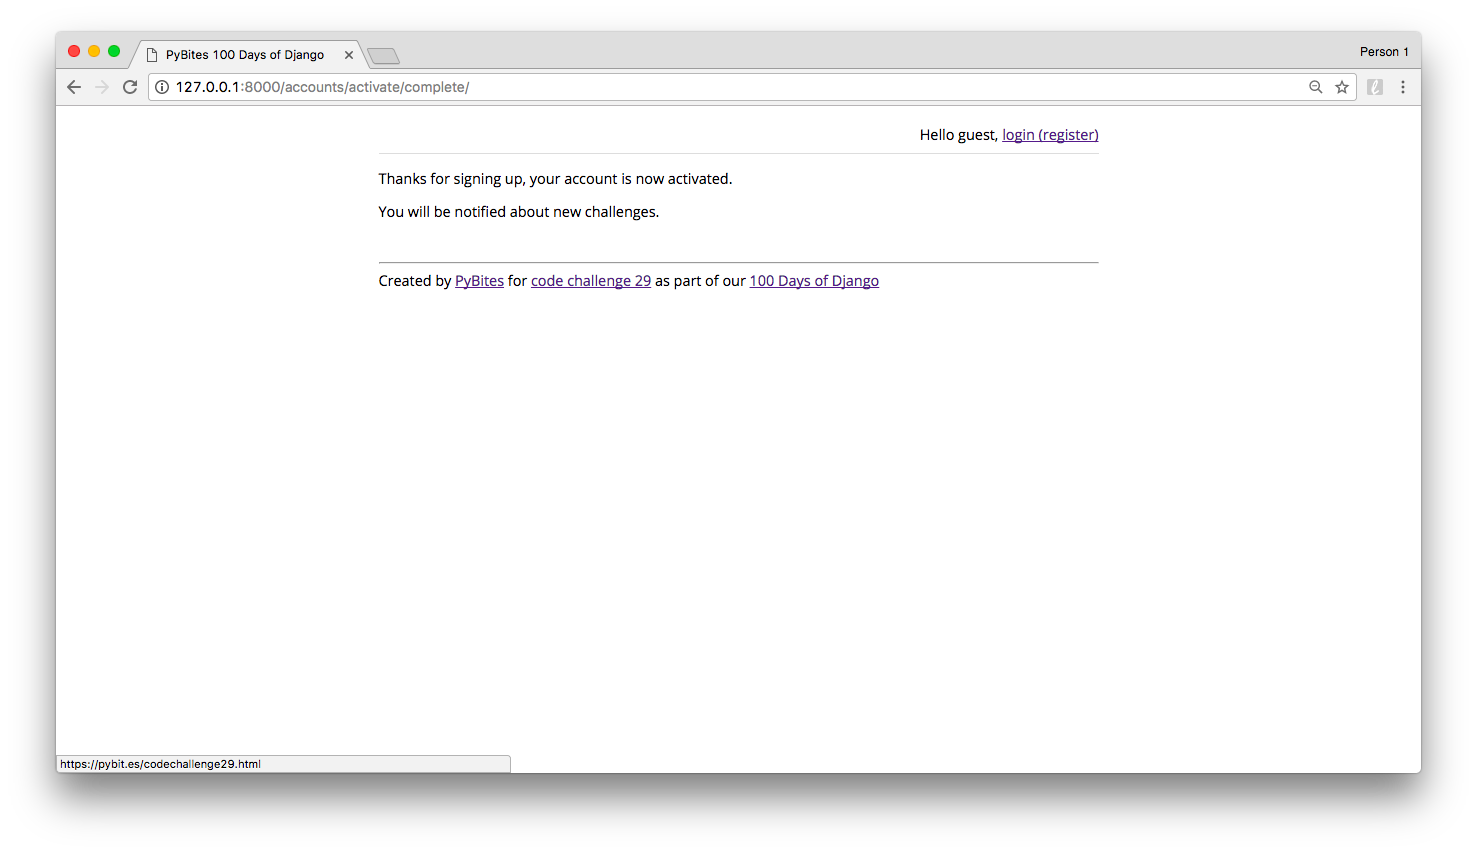
Click on the link and your account should be activated:
You can now login and you should see the logged in page:
TODO: have the user be logged automatically upon activation of account.
Commit to version control
Normally I would be make granular commits as we go but I wanted to focus on Django.
First of all init a repo – inside the register/ root folder (where manage.py lives):
(venv) $ git init
Make sure we don’t commit irrelevant files by adding a .gitignore file with the following content:
(venv) $ cat .gitignore
**pyc
**swp
**__pycache__
register/staticfiles/
*sqlite3
(last line is if you use a SQLite DB)
(venv) $ git add .
(venv) $ git commit -m "init commit"
Deploy to Heroku
Now let’s get our shiny app to the cloud. After all we did a lot of config in advance so it should be pretty easy now:
Heroku login
Install Heroku CLI and login.
(venv) $ heroku login
Make sure you are in register/ where manage.py lives. This is important because I had issues where I had Heroku look for wsgi.py under register/register and it would not work. So make sure you get this:
(venv) $ ls register/wsgi.py
register/wsgi.py
Add the following required files:
(venv) $ echo "python-3.6.2" > runtime.txt
Nice, Heroku uses Python 3.6!
(venv) $ echo  "release: python manage.py migrate" > Procfile
(venv) $ echo "web: gunicorn register.wsgi:application --log-file -" >> Procfile
The first line is not required but adds migration as extra step to each Heroku build, useful.
And finally let Heroku know what dependencies we need:
(venv) $ pip freeze > requirements.txt
Commit these 3 files:
(venv) $ git add .
(venv) $ git commit -m "added heroku config files"
You can test the site locally. If doing so store your env variables in .env (and make sure to exclude that file from version control!)
(venv) $ heroku local web
Crreate the app with a unique enough name:
(venv) $ heroku apps:create bobregistration
Creating ⬢ bobregistration... done
https://bobregistration.herokuapp.com/ | https://git.heroku.com/bobregistration.git
The git remote should be added automatically, if not run:
(venv) $ git remote add heroku https://git.heroku.com/bobregistration.git

(venv) $ git remote -v
heroku    https://git.heroku.com/bobregistration.git (fetch)
heroku    https://git.heroku.com/bobregistration.git (push)
If you want to use a Postgres DB provision it now, see here:
(venv) $ heroku addons:create heroku-postgresql:hobby-dev
Heroku automatically sets the DATABASE_URL env variable for you. The dj_database_url plugin we pip installed and configured in settings.py takes care of the rest. This makes the DB_ * variables only for local use. You can see your Heroku databases here.
Finally let’s set the other env variables via Heroku CLI:
(venv) $ heroku config:set SECRET_KEY='some_large_random_string'
(venv) $ heroku config:set DJANGO_ENV='production'
(venv) $ heroku config:set GMAIL_SMTP_USER='new_gmail_account'
(venv) $ heroku config:set GMAIL_SMTP_PASSWORD='gmail_pw_of_this_account'
With all this in place deploying to Heroku is very easy: just git push – awesome!
(venv) $ git push heroku master
Counting objects: 45, done.
Delta compression using up to 4 threads.
Compressing objects: 100% (42/42), done.
Writing objects: 100% (45/45), 16.95 KiB | 0 bytes/s, done.
Total 45 (delta 7), reused 0 (delta 0)
remote: Compressing source files... done.
remote: Building source:
remote:
remote: -----> Python app detected
remote: -----> Installing python-3.6.2
remote: -----> Installing pip
remote: -----> Installing requirements with pip
....
remote:        Successfully installed Django-1.11.4 dj-database-url-0.4.2 django-registration-2.2 gunicorn-19.7.1 psycopg2-2.7.3 pytz-2017.2
remote:
remote: -----> $ python manage.py collectstatic --noinput
remote:        66 static files copied to '/tmp/build_1f0fe577269a9c44ab8bdaa75f241a79/register/staticfiles'.
remote:
remote: -----> Discovering process types
remote:        Procfile declares types -> release, web
remote:
remote: -----> Compressing...
remote:        Done: 50.6M
remote: -----> Launching...
remote:  !     Release command declared: this new release will not be available until the command succeeds.
remote:        Released v9
remote:        https://bobregistration.herokuapp.com/ deployed to Heroku
remote:
remote: Verifying deploy... done.
remote: Running release command...
remote:
remote: Operations to perform:
remote:   Apply all migrations: admin, auth, contenttypes, sessions
remote: Running migrations:
...
remote: Waiting for release.... done.
To https://git.heroku.com/bobregistration.git
* [new branch]      master -> master
And voilà: the app now runs in the cloud. I will delete it after this tutorial, check out this version if you want to try it or subscribe to weekly PyBites Code Challenge notifications. Or better yet: host your own!
To add the superuser to the remote DB you can use Heroku’s shell:
(venv) $ heroku run python manage.py createsuperuser
...
In Closing
Wow, this was a lot to absorb but I wanted to get it out there. Although Django-registration makes it very easy to get two-phase registration going, getting to an end-to-end solution required some effort. Sorting out registration and authentication though is a major part of any modern app so I am glad we got this one down. It’s also easy to copy this project and build the other pieces around it.
I hope you found this tutorial useful. If you have any feedback or inputs use the comments below.
Julian (aka Flask addict), you have to give it to Django (plugins) that this is pretty slick stuff, no? I hope you learned a bite of Django too.
Keep Calm and Code in Python!
— Bob