Running your site or business good chance you A. use promo material like banners and B. you make them manually with Photoshop, Gimp or what not. And yes for anything beyond the basics you probably need those programs. But what if you like to keep it simple and want to semi-automate things? Just an image and text on canvas? Enter Pillow – The friendly PIL fork, which makes this pretty easy. Come explore some of its capabilities with me in this article.
The Python Imaging Library adds image processing capabilities to your Python interpreter. – docs
In this article we will use Pillow to create a simple promo banner for PyBites Code Challenges, starting with this week – how applicable! – #31 – Image Manipulation With Pillow.
By the way if you like to practice this stuff yourself, you should really join this week’s challenge 🙂
We will position 2 images on a canvas adding a title using a nice font. In part 2 I will wrap a Flask app around it so you can use it in the browser.
The complete code for this article is here.
Getting ready
First let’s create a virtual env and install Pillow
$ python3 -m venv venv && source venv/bin/activate
(venv) $ pip install Pillow
..
(venv) $ pip freeze > requirements.txt
(venv) $ mkdir banner && cd $_
(venv) $ touch __init__.py
Let’s get the images we will use for our banner.
(venv) $ mkdir assets && cd _
(venv) $ curl https://pybit.es/theme/img/page%7B-challenges.png%7D -o "pybites#1"
(venv) $ curl https://pbs.twimg.com/profile_images/510760404411109380/wDGjWJxk.png -o pillow-logo.png
(venv) $ cd ..
The #1 tells curl to use the string I wrapped in {} for output filename:
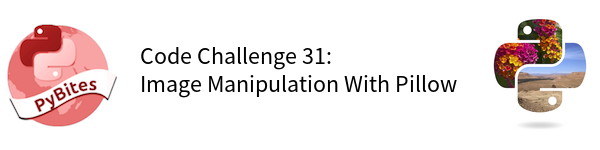
Step 1. – create a canvas and put our challenges logo on it:
Let’s write some code.
Disclaimer: we just write it in a procedural way to get something working. We will refactor it in step 4.
Create a banner.py and add the following code:
from pathlib import Path
from PIL import Image, ImageDraw, ImageFont

ASSET_DIR = 'assets'
PB_CHALLENGE_IMG = Path(ASSET_DIR, 'pybites-challenges.png')
PILLOW_IMG = Path(ASSET_DIR, 'pillow-logo.png')
DEFAULT_WIDTH = 600
DEFAULT_HEIGHT = 150
DEFAULT_CANVAS_SIZE = (DEFAULT_WIDTH, DEFAULT_HEIGHT)
DEFAULT_TOP_MARGIN = 15
WHITE = (255, 255, 255)

image = Image.new('RGB', DEFAULT_CANVAS_SIZE, WHITE)

pb_logo = Image.open(PB_CHALLENGE_IMG)
pb_logo_offset = (0, DEFAULT_TOP_MARGIN)
image.paste(pb_logo, pb_logo_offset)
pb_logo_width, pb_logo_height = pb_logo.size

image.save('out.png')
We do our imports and set up some constants. pathlib.Path is always best practice to join directories and filenames to make it compatible across different operating systems.
We create a new canvas with Image.new stating the dimensions and background color. We put (image.paste) the Pybites challenges logo at an offset of left=0, top=15. And we store the image’s width use height in variables for later use.
We save the image to a file which confirms this worked:
Step 2. – add a second image
The second image is the Pillow logo. But the original is 442 × 442. Let’s resize it. One way is to calculate it, like I did last time. Another way is using the thumbnail method as I found on this SO thread.
The offset of this second image gets calculated so it should still work if one day I decide to change the canvas or Pybites logo image sizes.
...

second_img = Image.open(PILLOW_IMG)
second_img.thumbnail(pb_logo.size, Image.ANTIALIAS)

offset_second_img = (DEFAULT_WIDTH - pb_logo_width, DEFAULT_TOP_MARGIN)
image.paste(second_img, offset_second_img)

...
Image.ANTIALIAS is a a high-quality downsampling filter which is recommended unless speed is much more important than quality.
Offsets in Pillow are (left, top). For top I use the same 15px. For width I want to align the second image to the right. To accomplish this I substract the image width (same as first image after resizing) from the total canvas width: 600px – 120px = 480px. This results in:
Again we will clean this up later. At this stage I want to get something working, then make it reusable.
Step 3. – add some text
Here we need ImageDraw and ImageFont we already imported.
ImageFont.truetype lets you work with nice fonts so let’s get a TrueType file.
I used Font Squirrel and downloaded Ubuntu and Source Sans Pro (latter we use on our blog). I included both in the assets folder.
Add this code:
...
BLACK = (0, 0, 0)
TEXT_FONT_TYPE = Path(ASSET_DIR, 'SourceSansPro-Regular.otf')
TEXT_SIZE = 24
TEXT_PADDING_HOR = 20
TEXT_PADDING_VERT = 40
IMG_TEXT = 'Code Challenge 31:\nImage Manipulation With Pillow'

...

draw = ImageDraw.Draw(image)
font = ImageFont.truetype(TEXT_FONT_TYPE, TEXT_SIZE)
offset_text = (pb_logo_width + TEXT_PADDING_HOR, TEXT_PADDING_VERT)
draw.text(offset_text, IMG_TEXT, BLACK, font=font)
...
We insert the text 40px from the top and 140px left (120px PyBites logo = first image width + 20px right padding) resulting in:
Step 4. – make it reusable
I did some refactorings to make it easier to maintain / extend. See on Github.
Few things to note:
-
I added a simple CLI interface (just
sys.argv, useargparseorclickif you need more inputs). You can now run it like:(venv) $ python banner.py Usage: banner.py img1 img2 text (venv) $ python banner.py assets/pybites-challenges.png assets/pillow-logo.png $'Code Challenge 31:\nImage Manipulation With Pillow'Note the required bash
$''syntax, otherwise the\nwon’t be interpreted as a newline. -
I use a class which makes this cleaner / easier to extend.
-
I calculated the
DEFAULT_TOP_MARGIN= 150px height, image1 = 120px = 30px / 2 = 15px for top margin. -
I use named tuples which you should lookup if you’re not familiar with them yet. One interesting use case is the reduction in function parameters for
add_text: using a named tuple object it reduces the interface from 5 to 1 argument (see also the Introduce Parameter Object refactoring). -
I added the
self.image_coordslist to keep track of images being added to calculate where the text should go (right edge of most left image).
What’s next?
Now it’s time to let the user interact with it via a simple (Flask) web app.
I will be doing that as part of this week’s code challenge and will follow up with a part 2 article. Stay tuned …
Pillow makes image manipulation easy and fun again. I hope this inspires you to try it out for yourself …
Update 20/08/2017: check out part 2 where I wrap this script into a Flask app. In part 3 I automate banner generation with Requests and Selenium.
Keep Calm and Code in Python!
— Bob