Ever wondered how you scrape hidden (or JS generated) HTML? Selenium is your friend. Ever wondered how to run it without a browser popping up? Use headless mode. How would you run it remotely? Use Heroku. And how about autoposting to Slack and Twitter?
With the right libraries and API setup little code is needed. In this 10 step guide I will show you how to build a Packt Free Learning Notifier which will accomplish all these tasks. Ready to learn some nice automation skills in Python?
Part I. the parser
1. Setup
Packt has this awesome Free Learning campaign: a free ebook a day. It even includes video these days. Thank you Packt!
We had a nice daily notification posting into our Slack #books channel, until it started posting empty messages. Oops!
The page still works:

However looking at the HTML it changed:

2. Where is the HTML?!
… wait that title string surely was on the page, no? Let’s do an inspect:
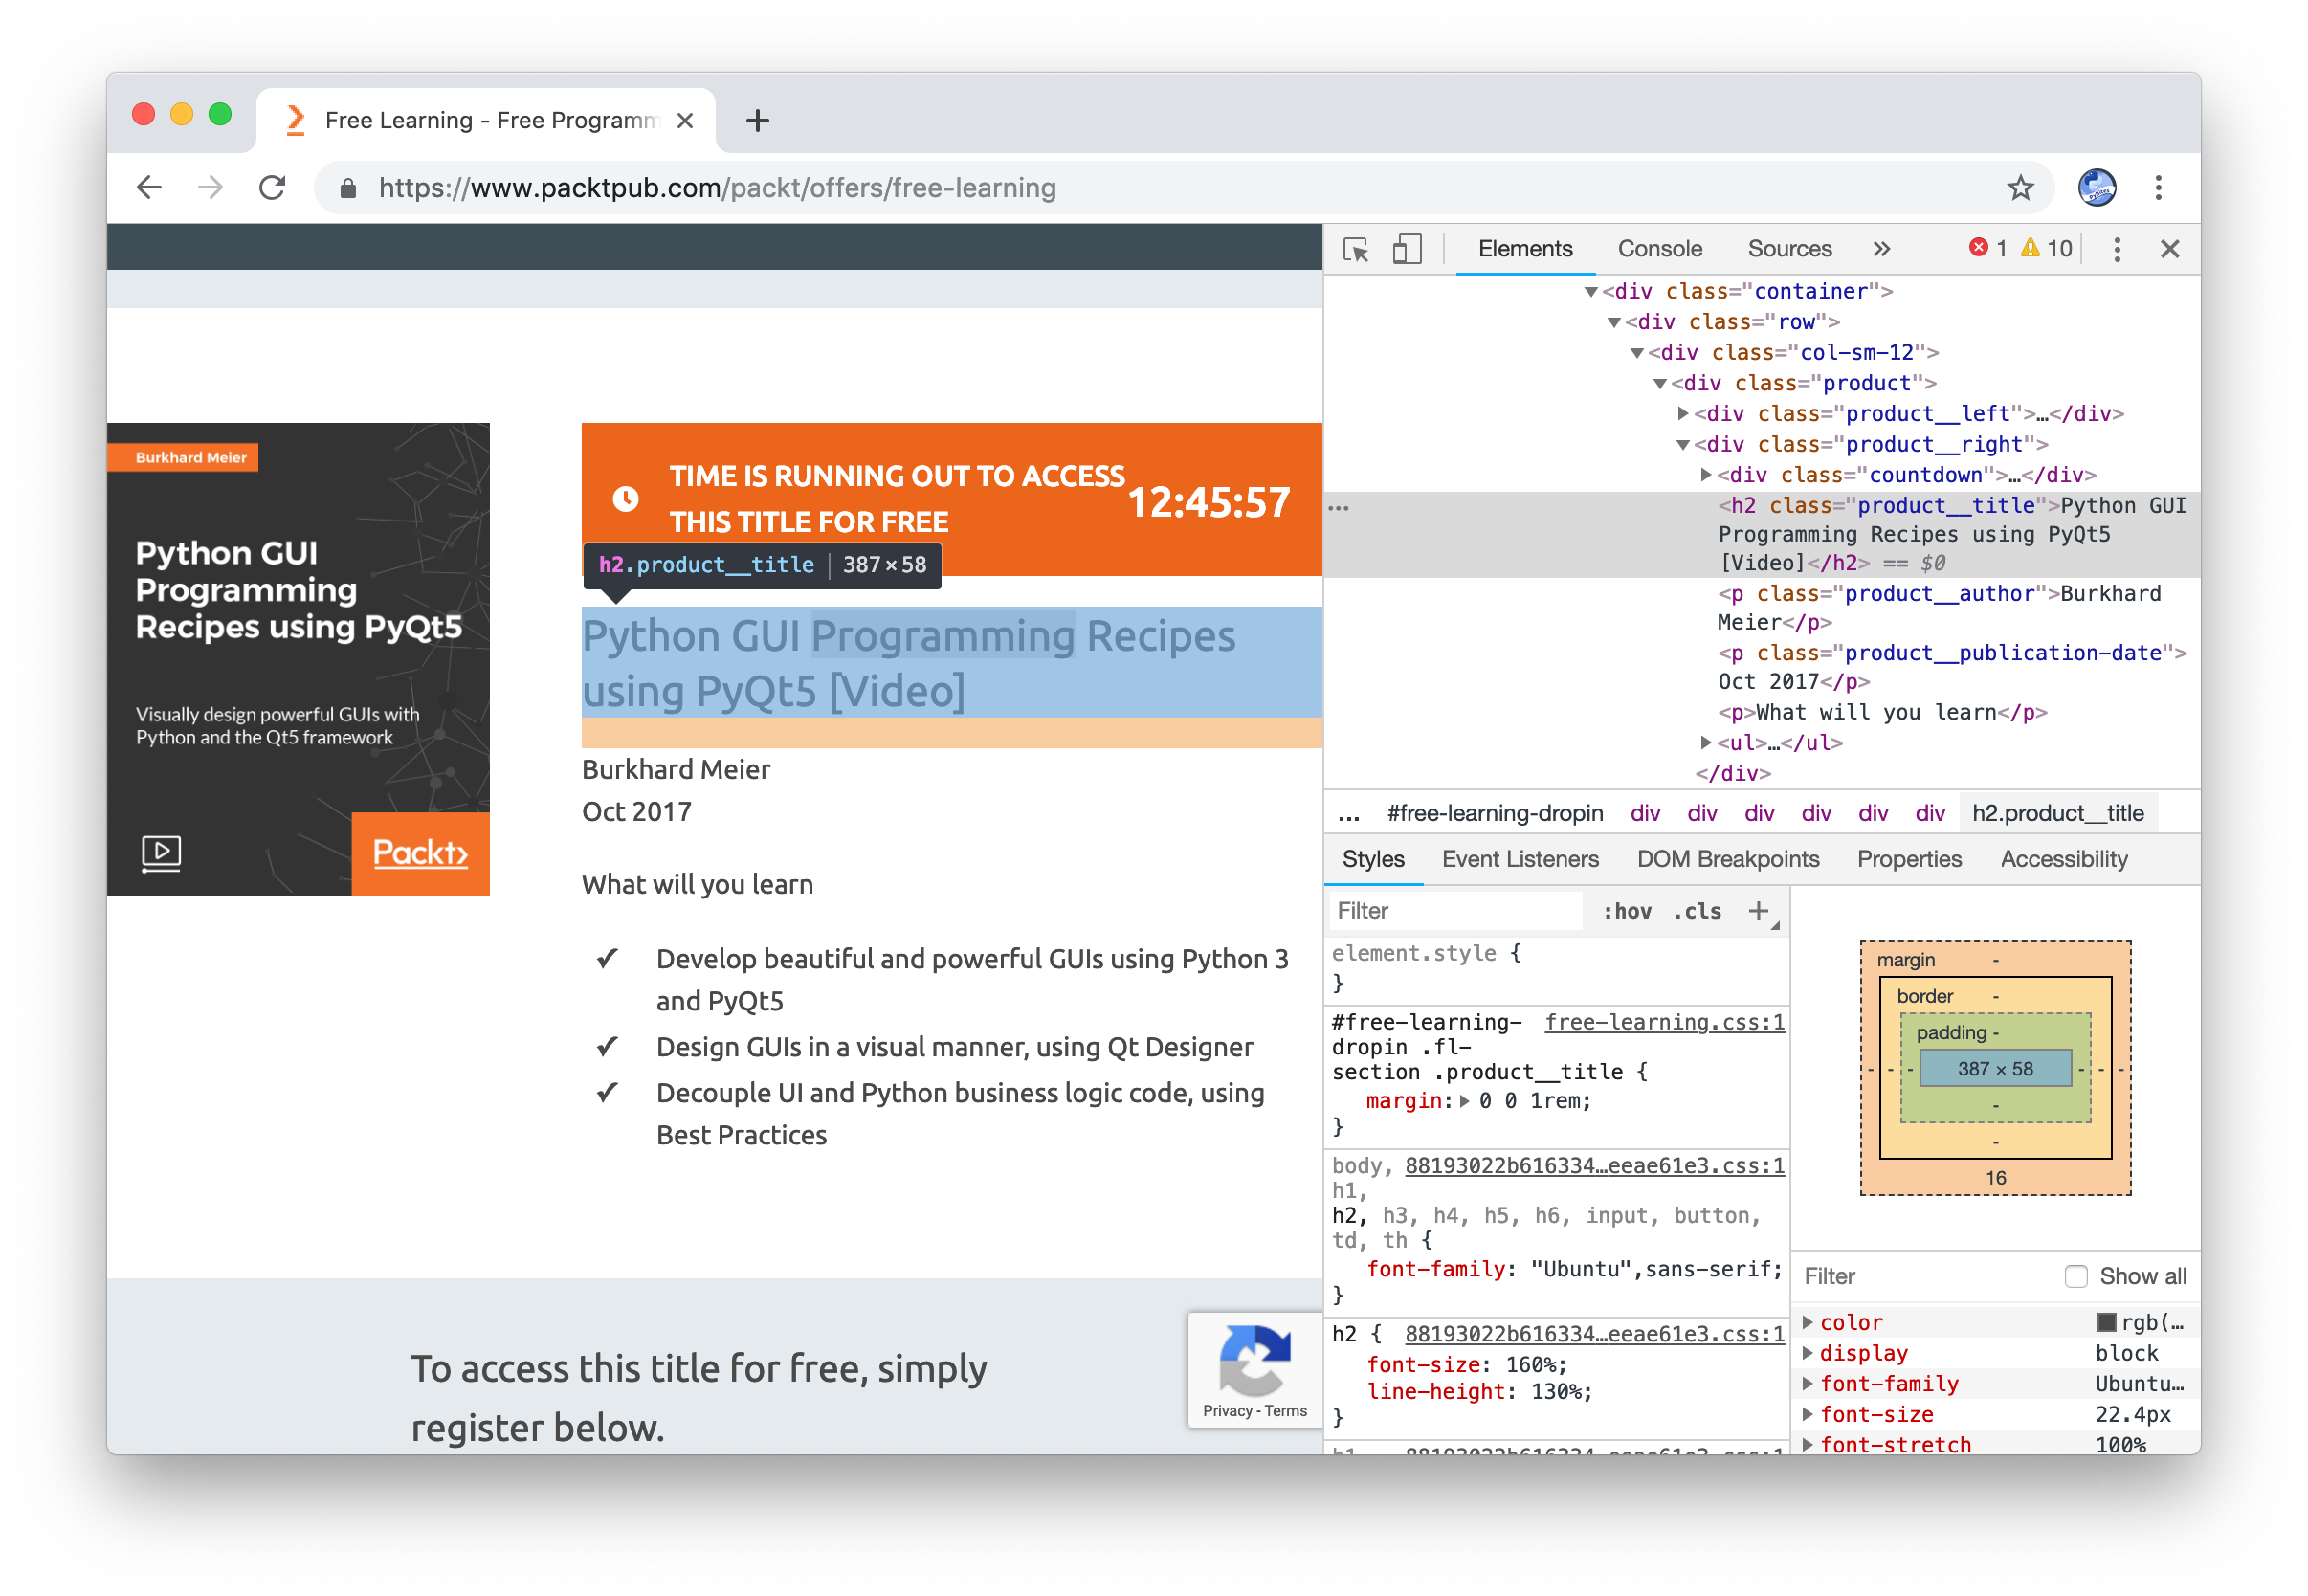
Let’s look for the class:

OK is this content generated by JS? I verified our Packt PyTweet BeautifulSoup code and indeed it came up empty. But wait what was that testing tool I played with the other day?
3. Selenium to the rescue
Selenium seemed to have no issues finding these “hidden” CSS classes!
What follows are snippets to keep the flow of the post, you can find the complete code/repo here …
driver.get(PACKT_FREE_LEARNING)

find_class = driver.find_element_by_class_name

title = find_class('product__title').text
author = find_class('product__author').text
pub_date = find_class('product__publication-date').text
timer = find_class('countdown__title').text.splitlines()[-1]

driver.quit()

book = Book(title, author, pub_date, _get_expired(timer))
return _create_update(book)
Book is a namedtuple I populate with my findings. Easy enough! But I inmediately thought about:
- Scaling: how to post this valuable info to social media – bear with me …
- Deployment: I don’t want to run this manually every morning, how to automate this, and therefore: how to run Selenium remotely?!
4. Adding headless mode
This led me to Selenium’s headless mode. This is pretty easy to configure using Selenium’s Options object (as imported from selenium.webdriver.chrome.options):
options = Options()
options.add_argument("--headless")
options.binary_location = GOOGLE_CHROME_BIN
options.add_argument('--disable-gpu')
options.add_argument('--no-sandbox')
GOOGLE_CHROME_BIN is defined as an environment variable, because it will be different according to the env we run our script in. More on this in a bit.
There is quite a bit more to it and thankfully I found Emanoeli M’s Stack Overflow thread which pointed me in the right direction.
5. Deploy to Heroku part I – adding buildpacks
First I deployed the script to Heroku using its Git procedure, basically:
- make sure you have Heroku CLI installed
- create an app:
heroku create - push to new remote:
git push heroku master - try to run the script:
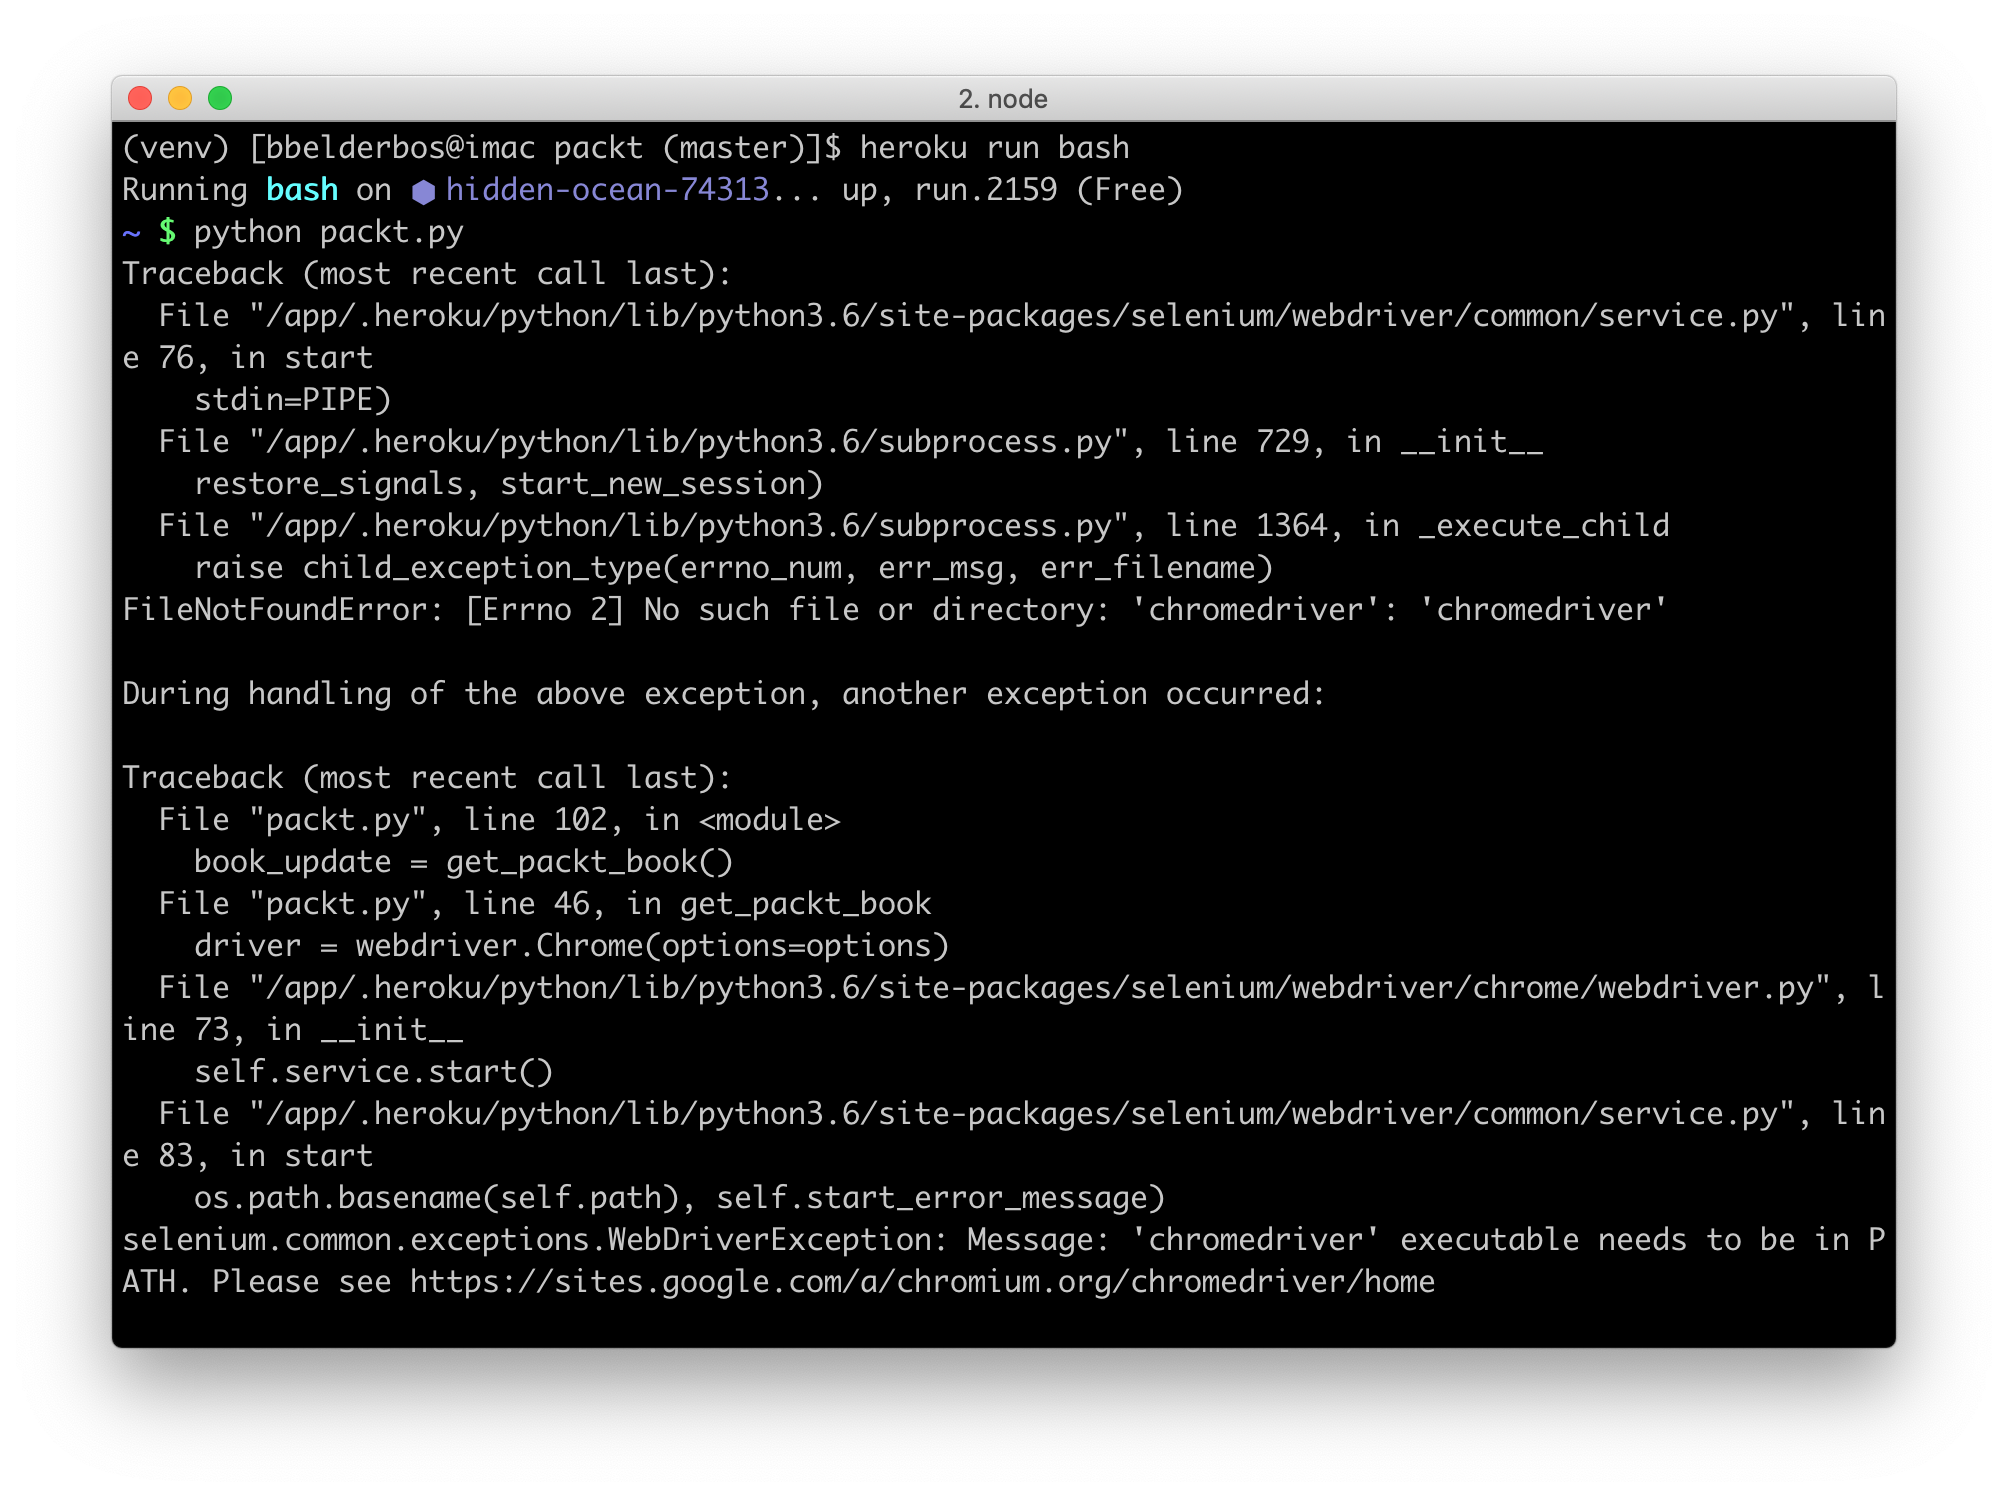
heroku run bash->$ python packt.py
This of course failed because the new app sandbox could not locate the chromedriver. I naively thought that was the only requirement, but you actually also need the Chrome browser. This meant getting familiar with Heroku’s buildpacks!
The default buildpack Heroku auto-detected was the Python one, good.
Here are the commands to add the chromedriver and Chrome. Note that heroku-buildpack-xvfb-google-chrome (from the SO thread) gave me some compatibility issues so I ended up using heroku-buildpack-google-chrome!
$ heroku create --buildpack https://github.com/heroku/heroku-buildpack-chromedriver.git
$ heroku buildpacks:add heroku/chromedriver
And:
$ heroku create --buildpack https://github.com/heroku/heroku-buildpack-google-chrome
$ heroku buildpacks:add heroku/google-chrome
(see all Heroku’s buildpacks here)
So I ended up with 3 buildpacks!
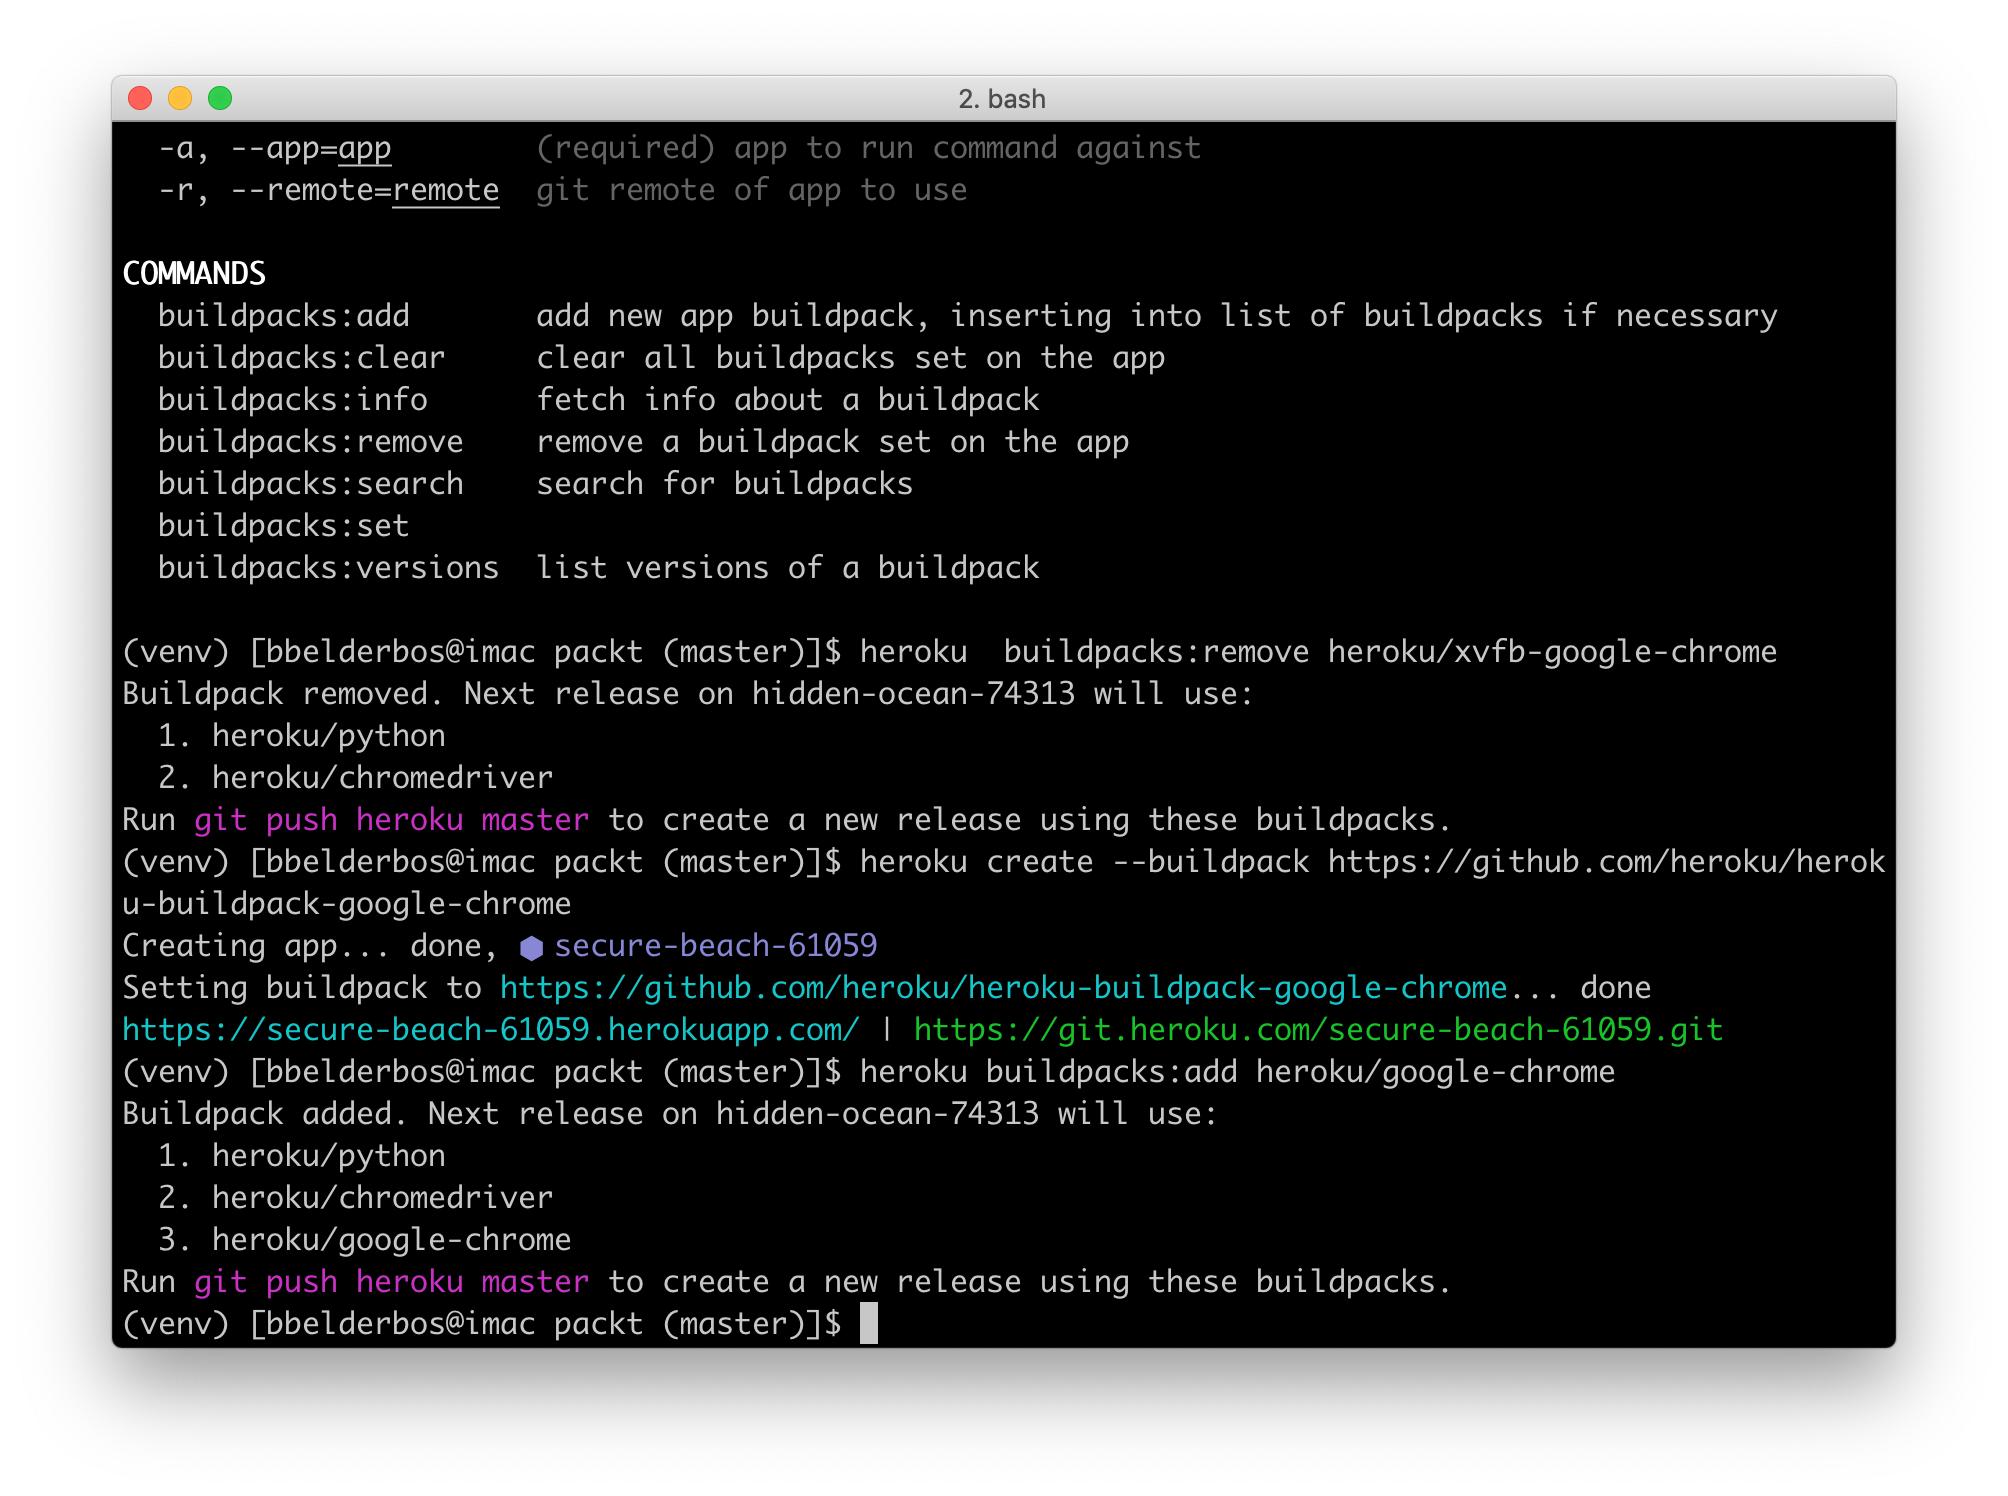
(ignore secure-beach, I was playing around …)
And upon the next git push heroku master it got really busy installing Chrome 🙂

That in and by itself was still not enough:
6. Deploy to Heroku part II – setting env variables
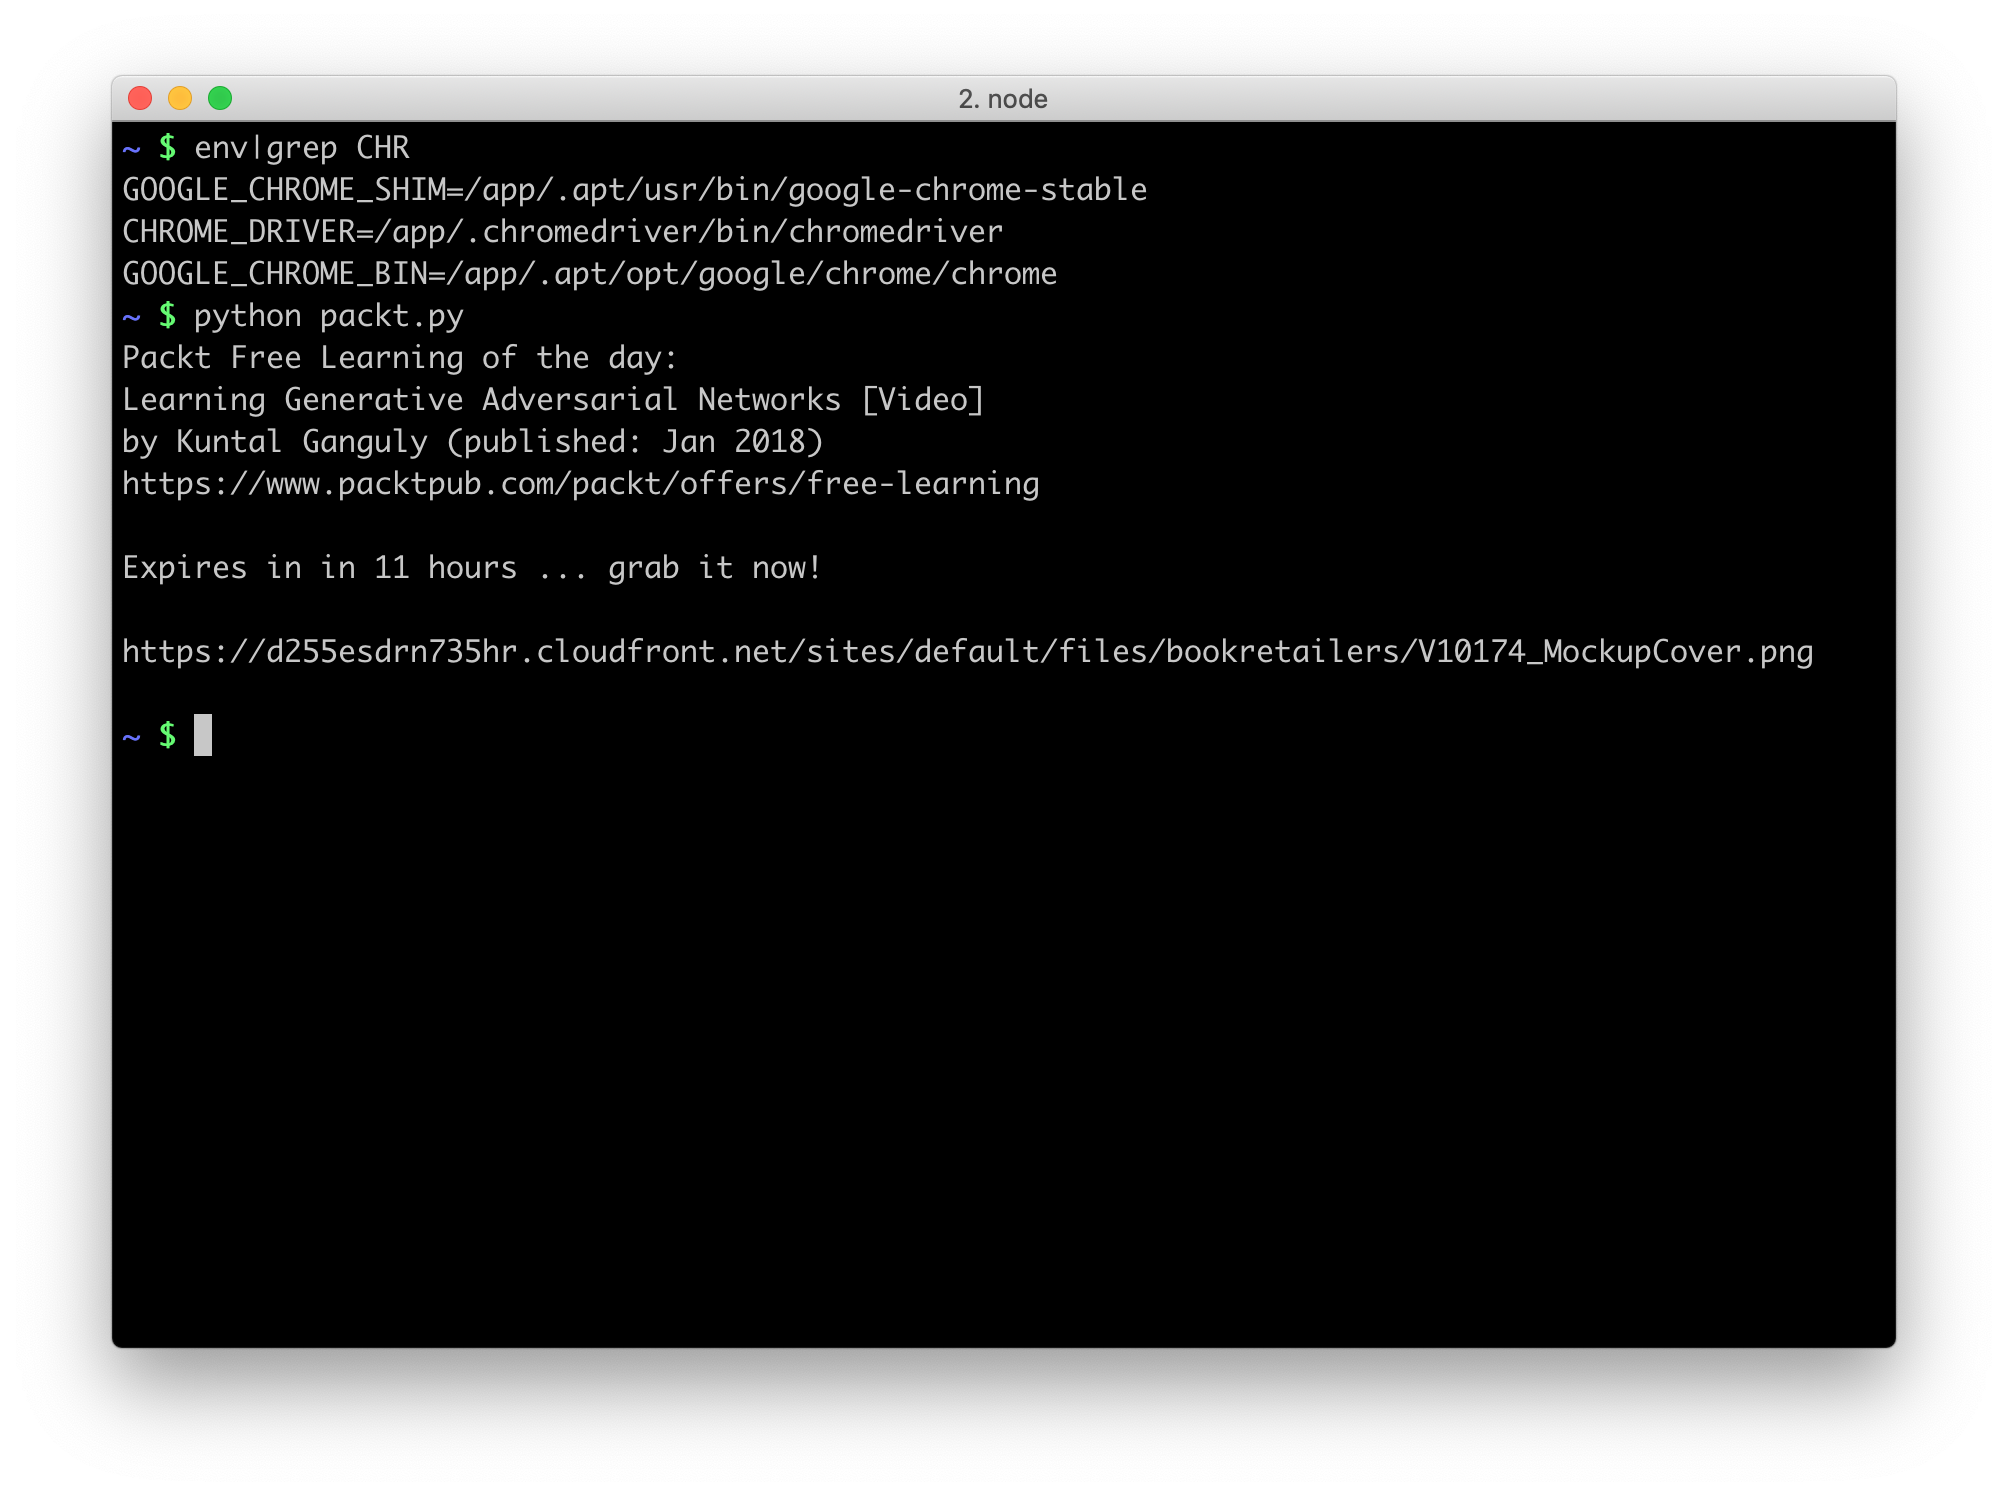
To let Selenium know where to find the chromedriver and Chrome binaries, I had to define 2 environment variables. Compare how they look locally (to isolate them, I set them in my venv/bin/activate script):
export CHROME_DRIVER=/Users/bbelderbos/bin/chromedriver
export GOOGLE_CHROME_BIN="/Applications/Google Chrome.app/Contents/MacOS/Google Chrome"
vs. remotely on Heroku (hence why we call them environment variables):
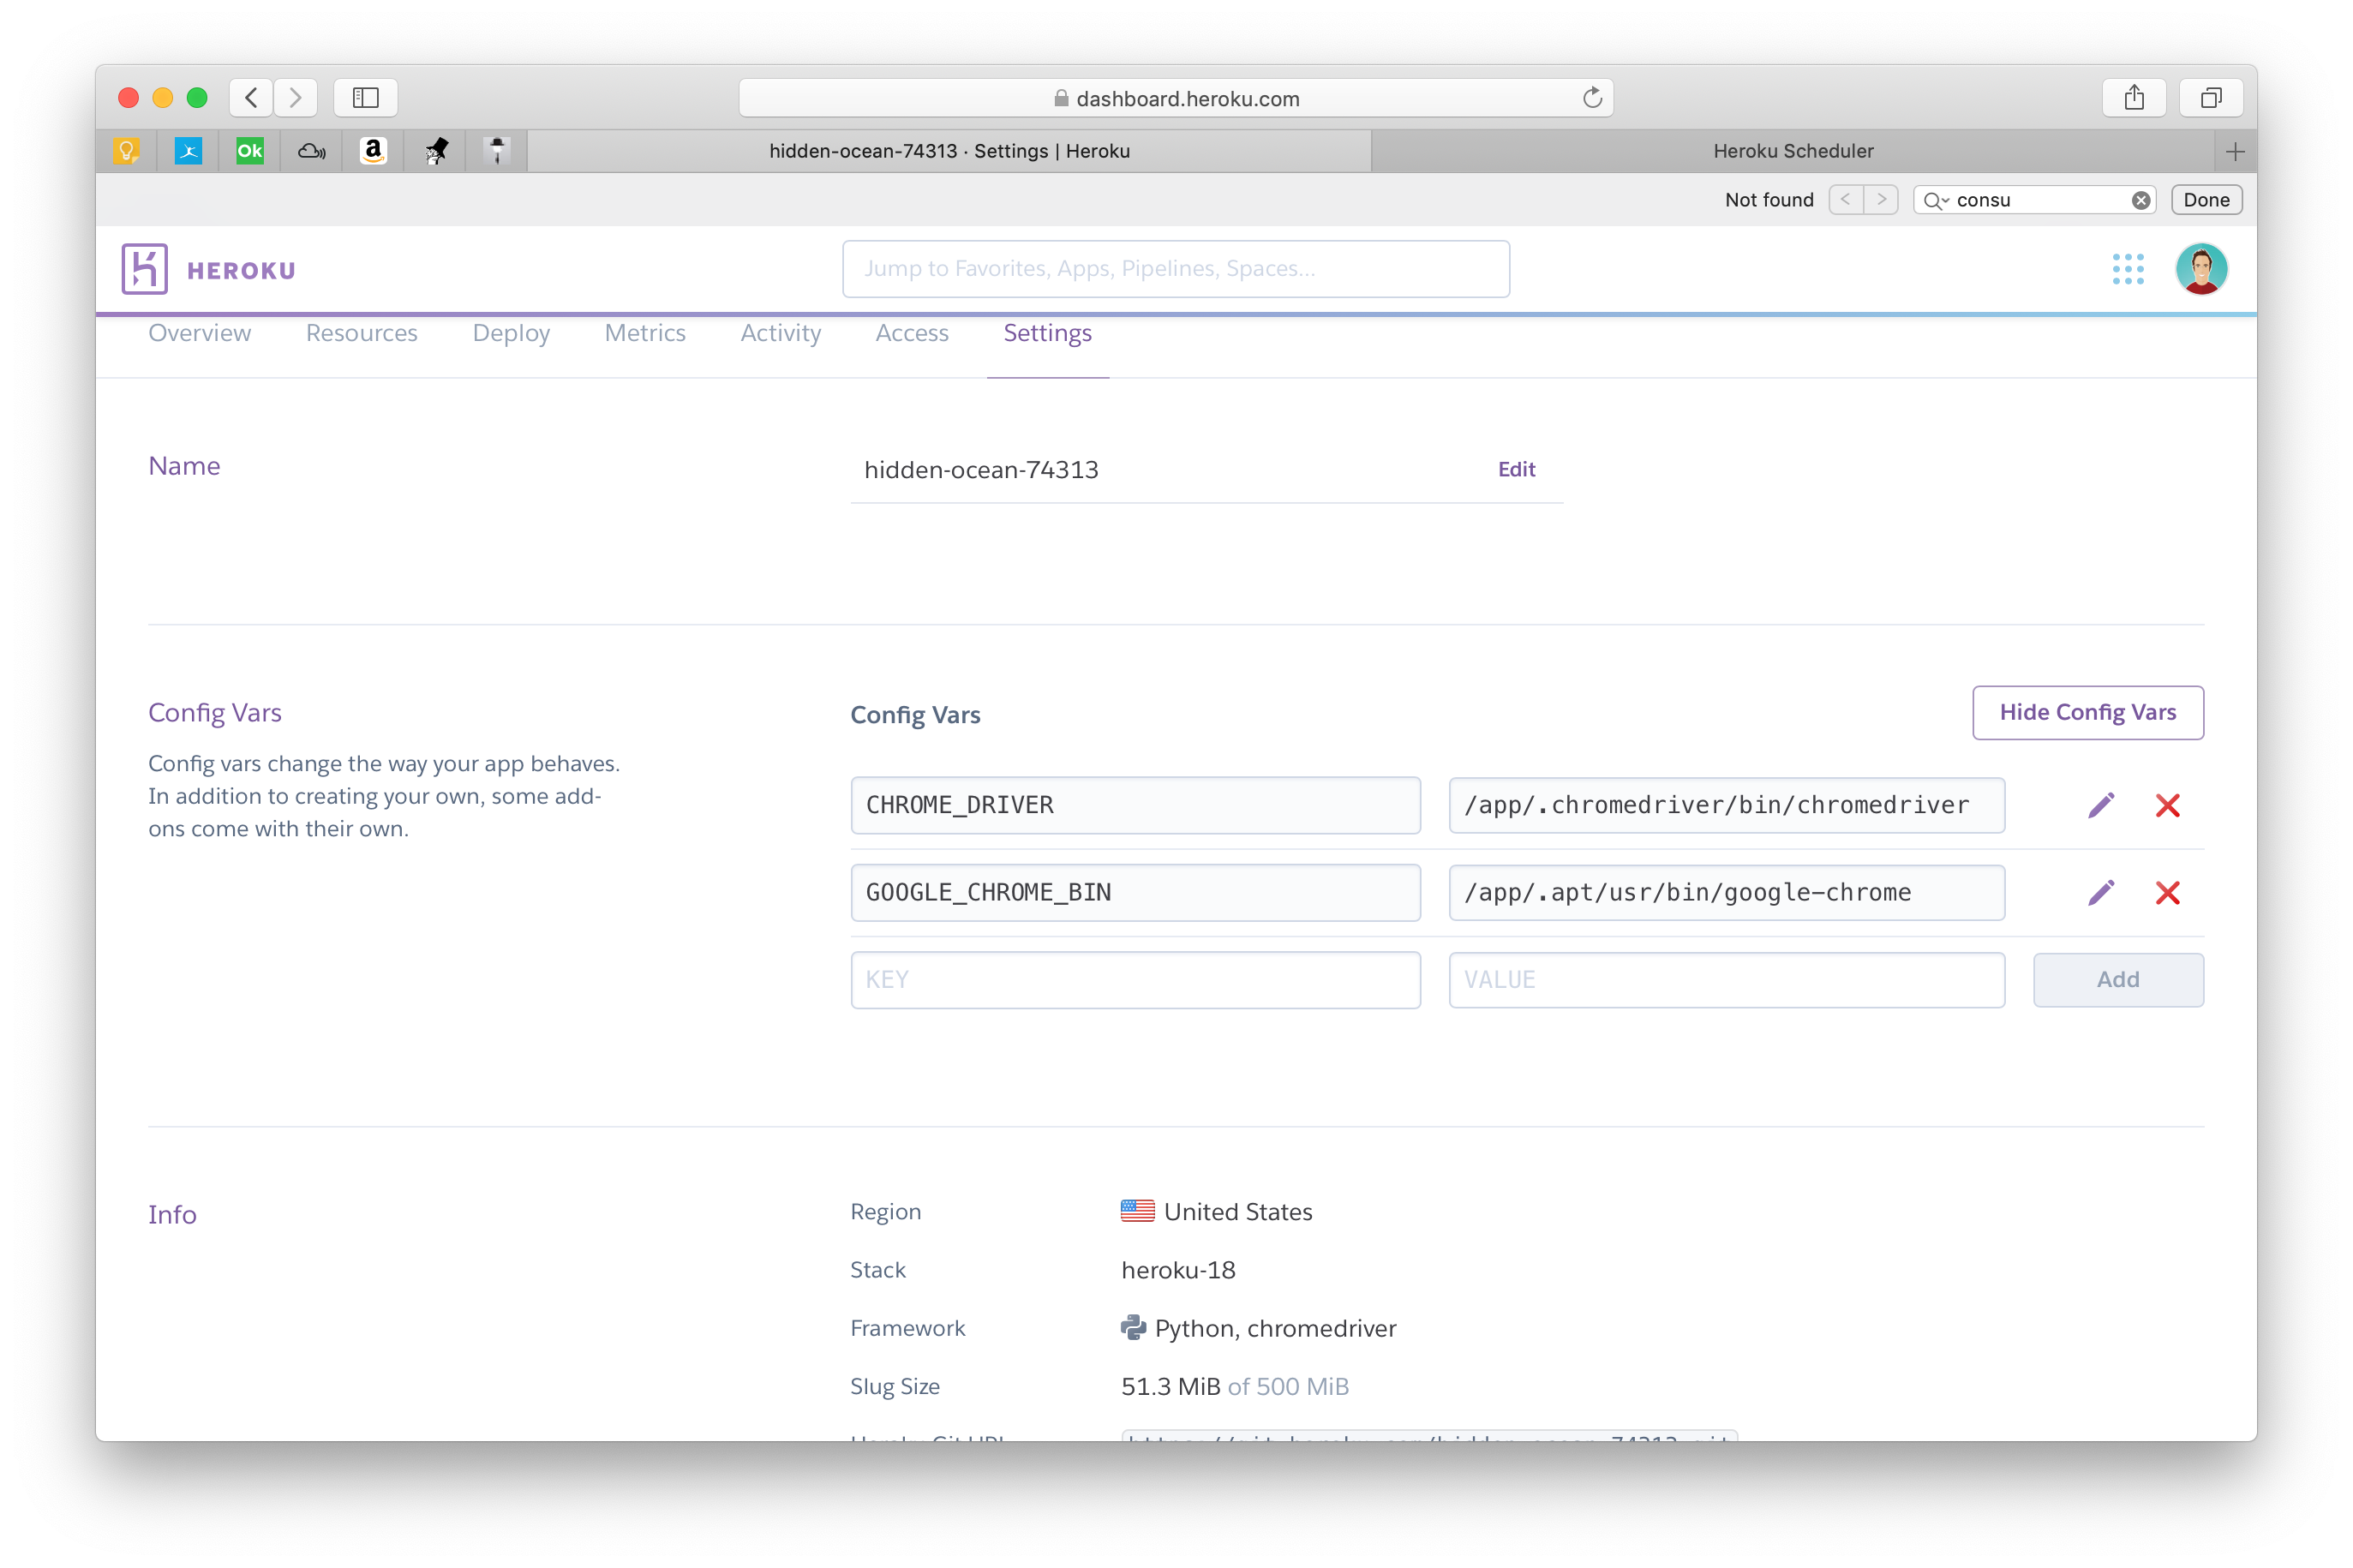
After setting those in the heroku.com GUI they show up when entering in the Heroku shell (run: heroku run bash) and like magic the script started to work!
Part II – sharing is caring
Awesome! Let’s indulge in a moment of celebration: not only did we manage to scrape “hidden” HTML (was that even possible?!), what’s even more mindblowing to me is that we also got Selenium to run without opening a Browser window (also known as headless mode) in the cloud!
This gave us the possibility to run our script on a remote server == automation for fun and profit 🙂
Well back up a bit there … not much “profit” if it only spits out something to stdout never to be seen again unless you like consuming heroku logs …
So let’s do something more interesting …
7. Auto-posting to Twitter
First you need to make a Twitter app via its API. Then set the required keys and tokens as environment variables:
export CONSUMER_KEY=123
export CONSUMER_SECRET=456
export ACCESS_TOKEN=123
export ACCESS_SECRET=456
I use tweepy which makes posting to Twitter a breeze:
def twitter_authenticate():
    auth = tweepy.OAuthHandler(CONSUMER_KEY, CONSUMER_SECRET)
    auth.set_access_token(ACCESS_TOKEN, ACCESS_SECRET)
    return tweepy.API(auth)


def post_to_twitter(book_post):
    try:
        api = twitter_authenticate()
        api.update_status(book_post)
        print(f'Shared title on Twitter')
    except Exception as exc:
        print(f'Error posting to Twitter: {exc}')
8. Auto-posting to Slack
Similarly you create an app via the Slack API and submit it to the Admins for approval. Upon approval you install the app into the workspace and you can then create an incoming webhook.
You would want this URL to be secret so we also load this in from the environment:
export SLACK_WEBHOOK_URL=https://hooks.slack.com/services/123/456/789
Then we use requests to post to this webhook, pretty straightforward:
def post_to_slack(book_post):
    payload = {'text': book_post}
    headers = {'Content-Type': 'application/json'}
    resp = requests.post(SLACK_WEBHOOK_URL,
                         data=json.dumps(payload),
                         headers=headers)
    if resp.status_code == 200:
        print(f'Shared title on Slack')
    else:
        print(f'Error posting to Slack: {resp.status_code}')
9. Make a simple CLI interface with argparse
Next we want to make some command line switches to enable/disable posting to Twitter and Slack. argparse makes this pretty easy. I put this under the main block to only run it when the script is called directly:
if __name__ == '__main__':
    description = 'Packt free book (video) of the day'

    parser = argparse.ArgumentParser(description=description)
    parser.add_argument('-t', '--twitter', action='store_true',
                        help="Post title to Twitter")
    parser.add_argument('-s', '--slack', action='store_true',
                        help="Post title to Slack")
    args = parser.parse_args()

    book_update = get_packt_book()
    print(book_update)

    if args.slack:
        post_to_slack(book_update)

    if args.twitter:
        post_to_twitter(book_update)
argparse adds a nice helper message by default:
$ python packt.py -h
usage: packt.py [-h] [-t] [-s]

Packt free book (video) of the day

optional arguments:
-h, --help     show this help message and exit
-t, --twitter  Post title to Twitter
-s, --slack    Post title to Slack
10. Deploy to Heroku part III – use the Scheduler addon
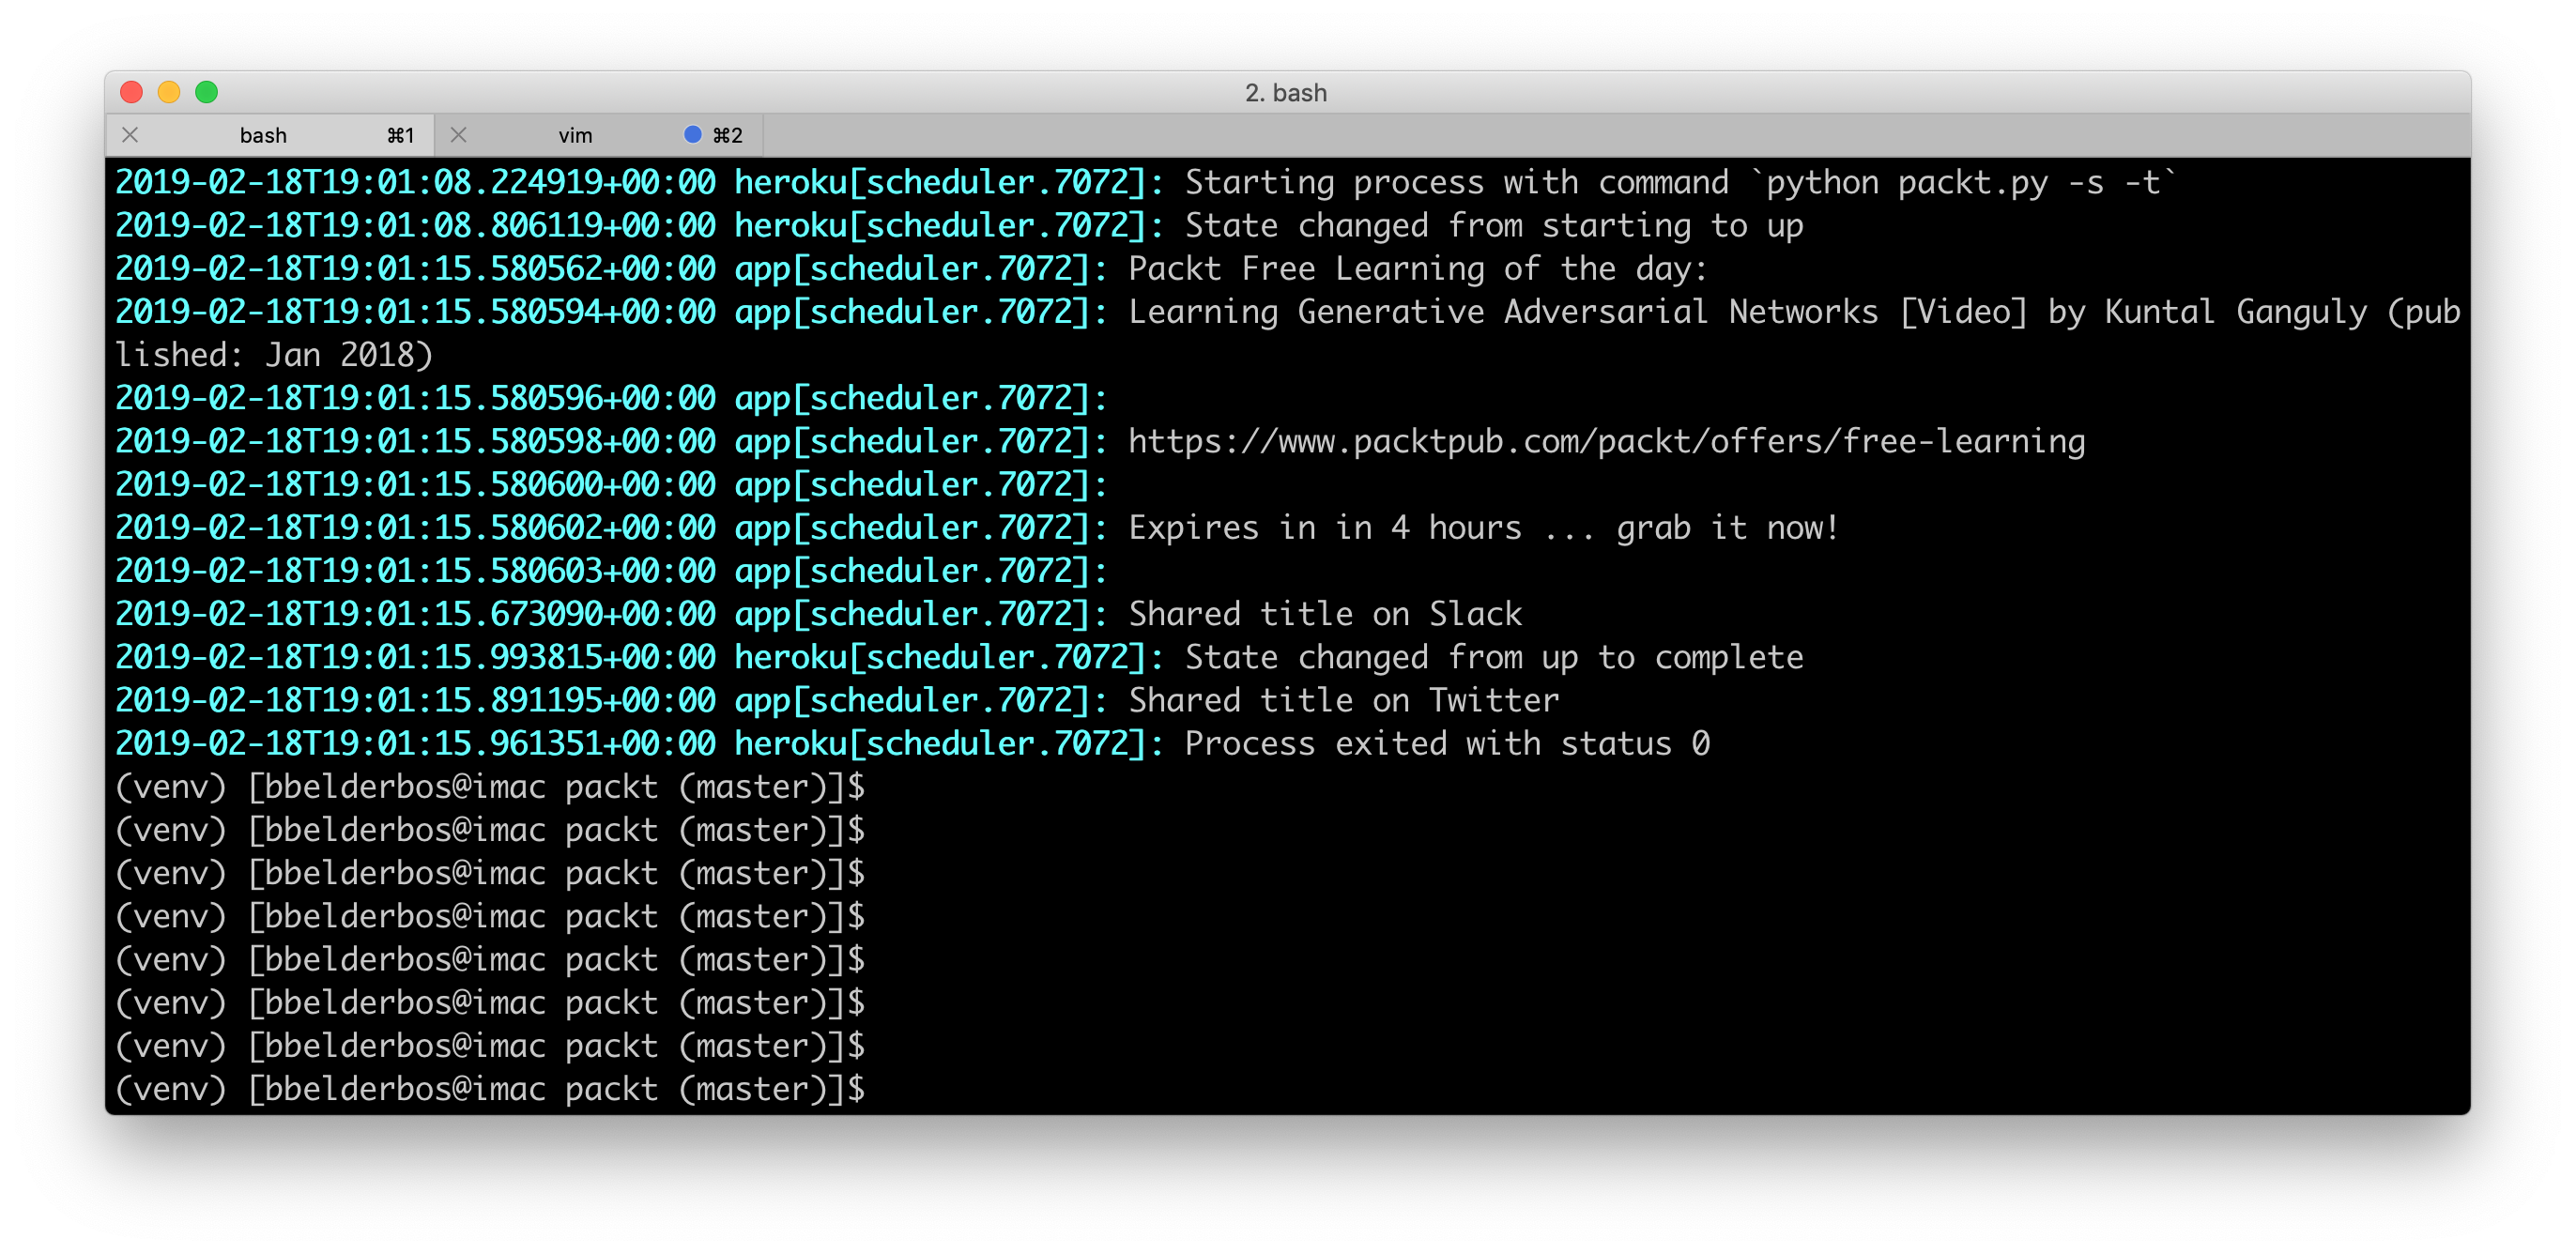
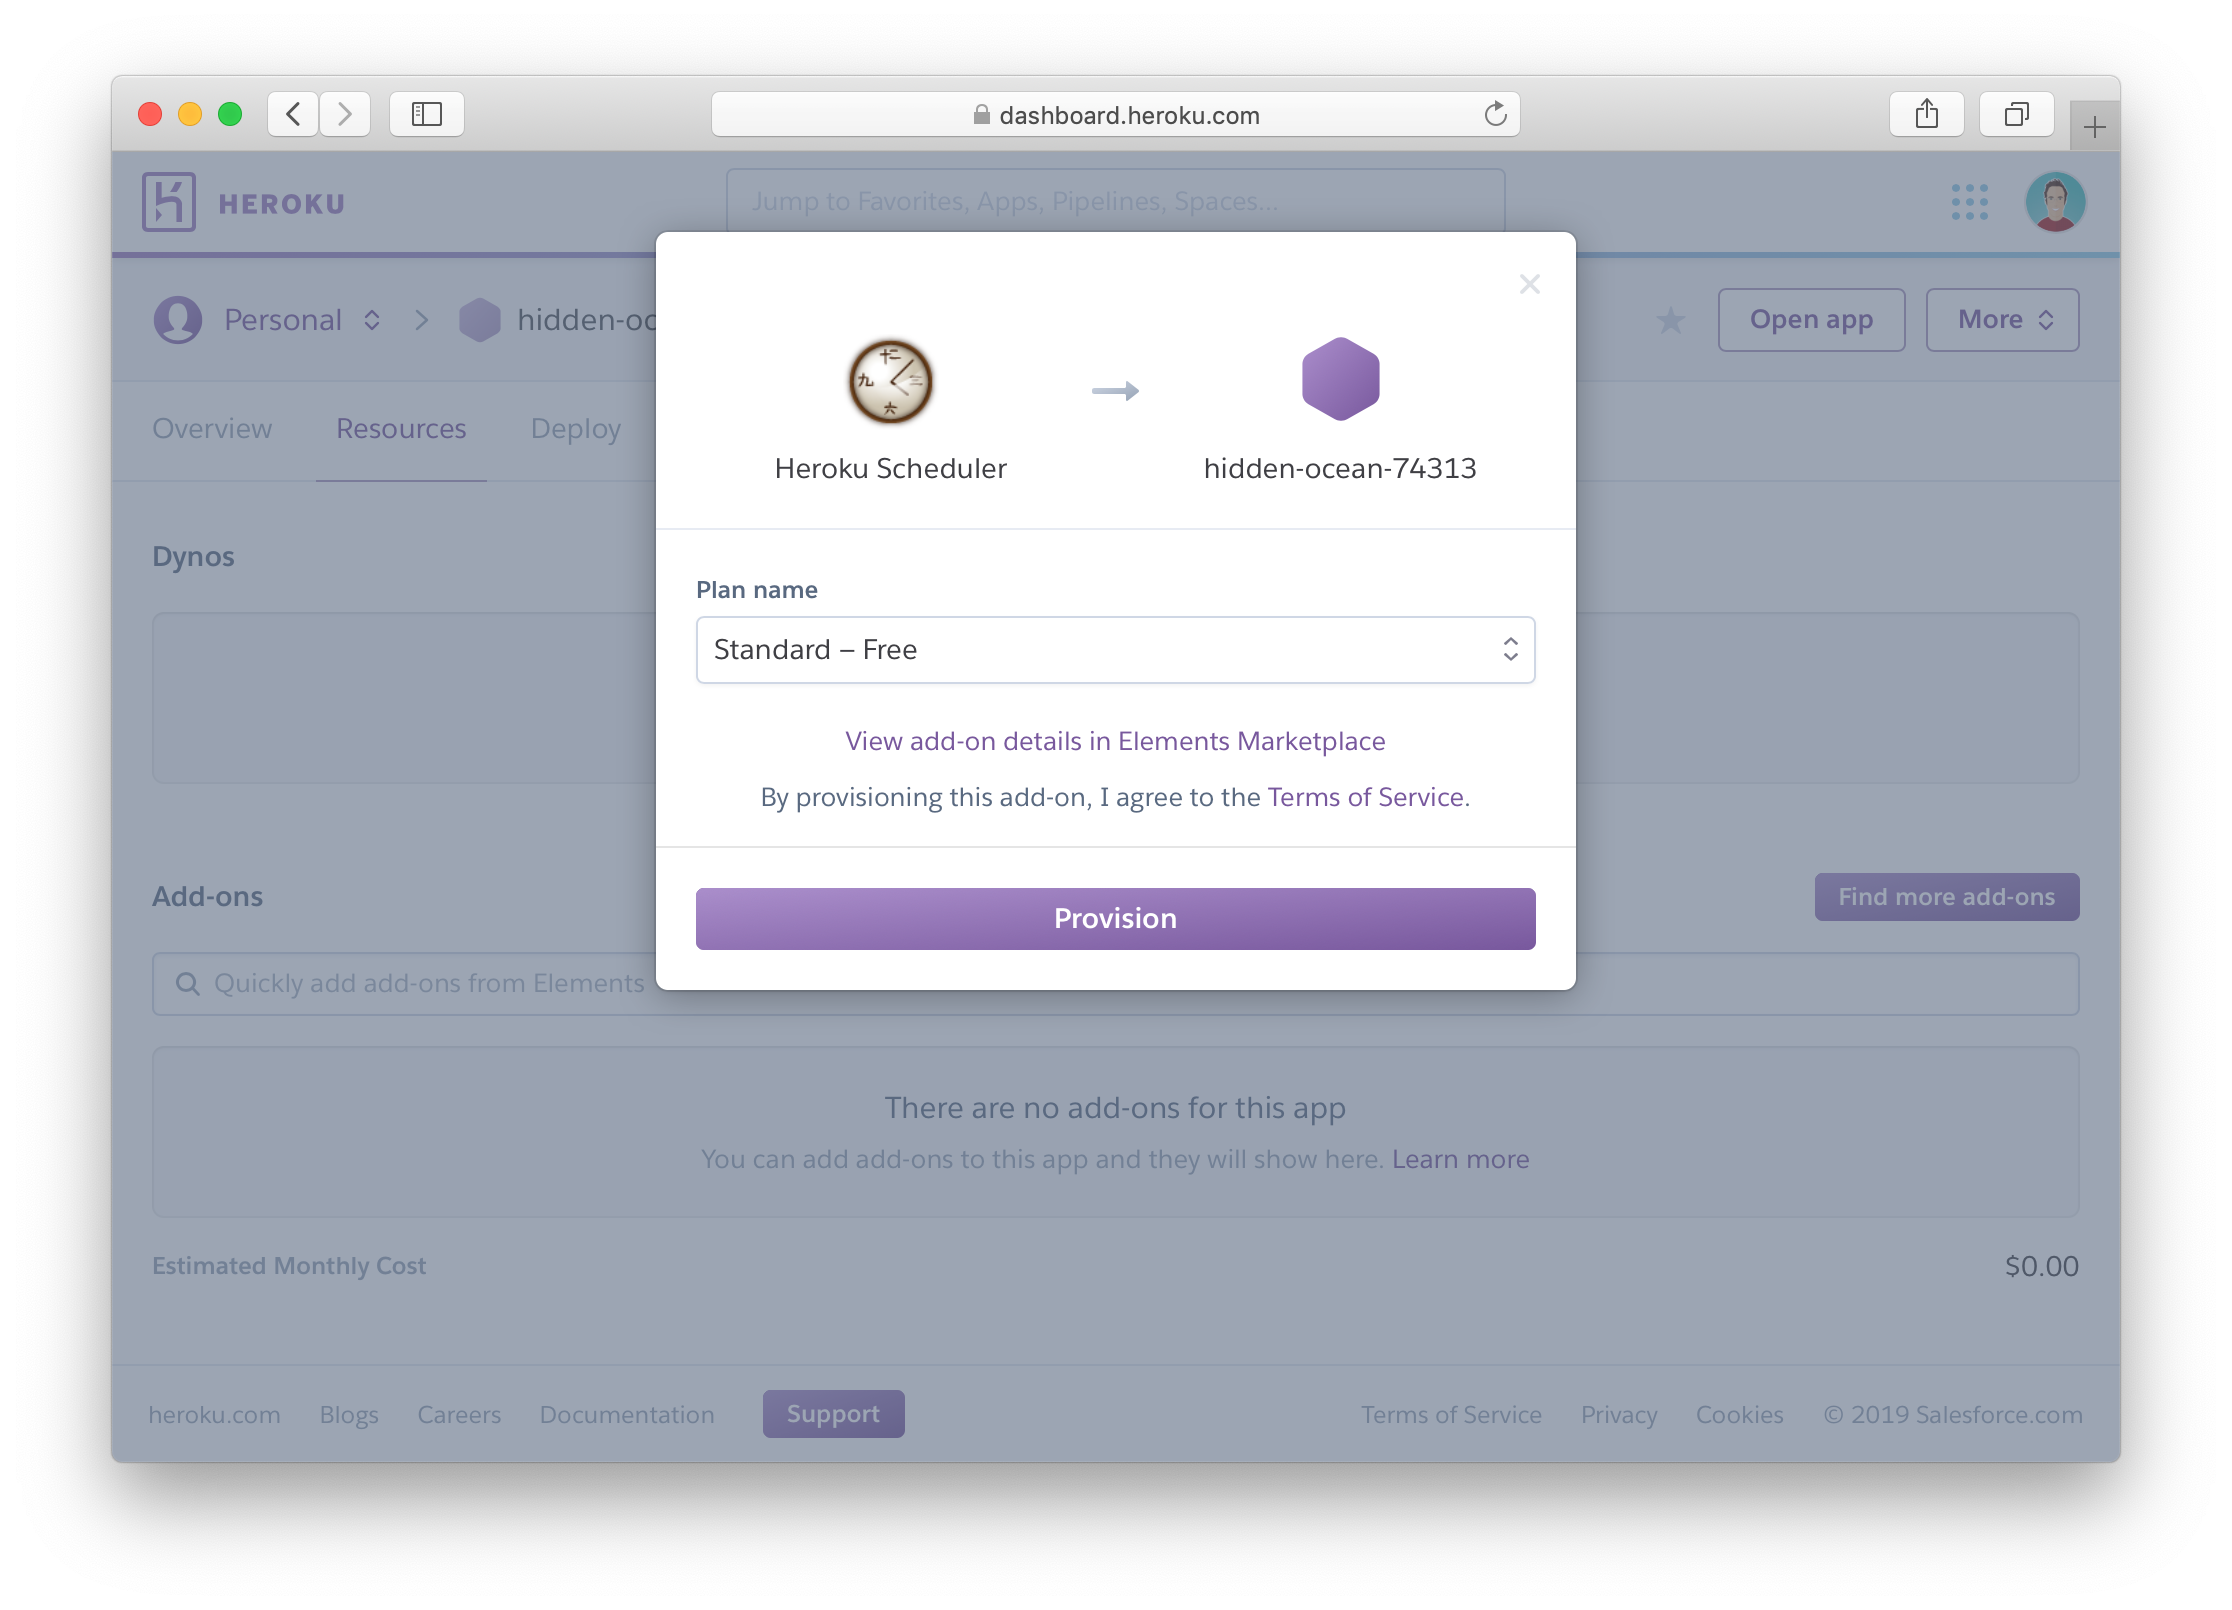
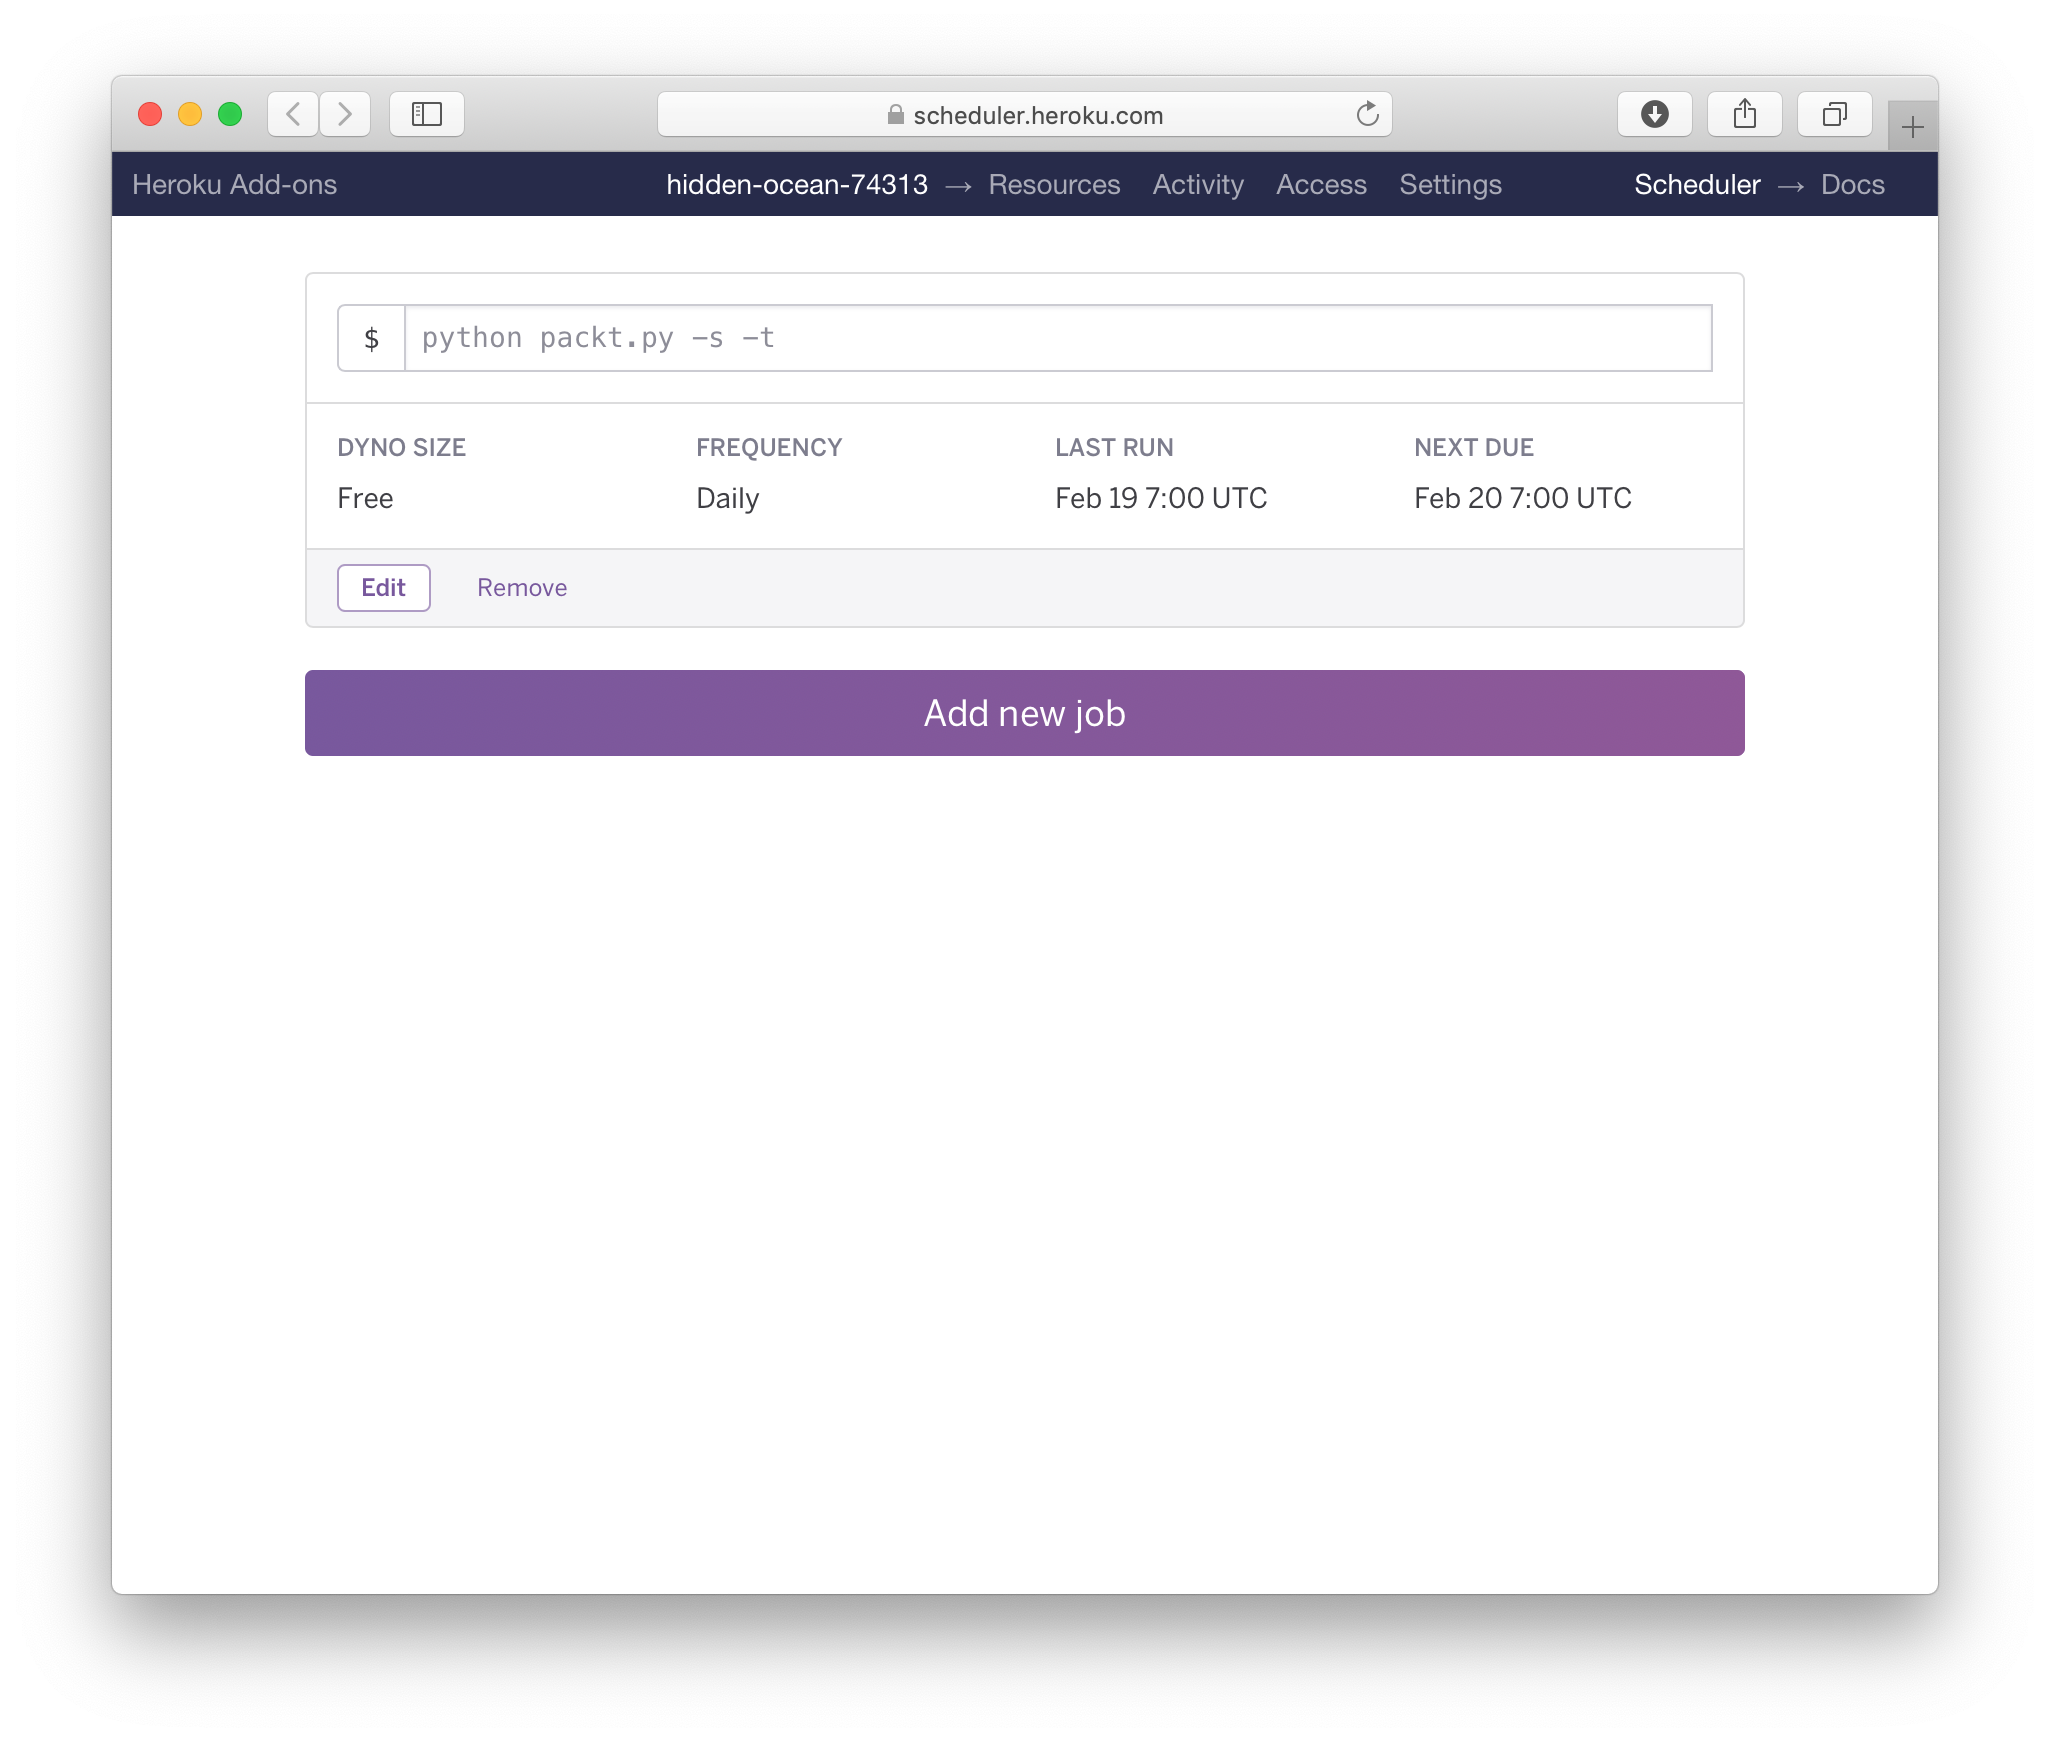
Finally I wanted to have this script auto-post the daily Free Learning resource to Twitter and Slack automatically. Enter the free Heroku Scheduler addon which you can add under the “Resources” tab of your app via Heroku’s GUI:
We can just specify the script and command line switches, just as if we ran it locally. The dependencies and environment variables are already loaded in the app sandbox when this executes! Let’s notify early in the morning (my local time):
Result

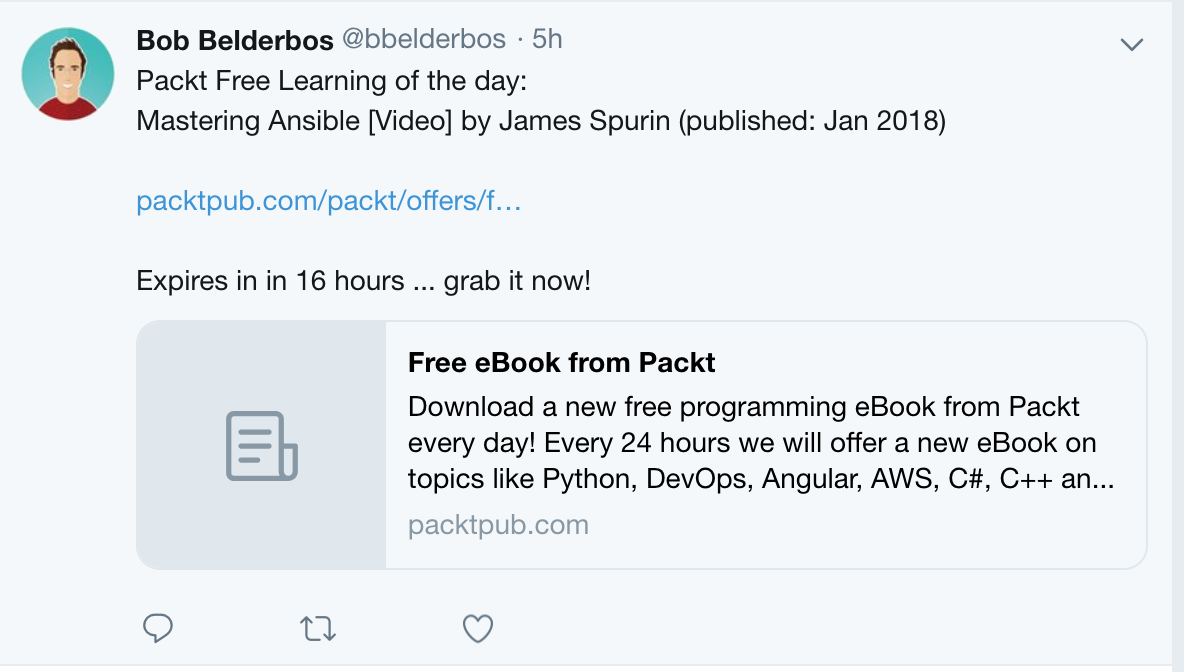
Voilà: this morning I saw this auto-posted to my Twitter:
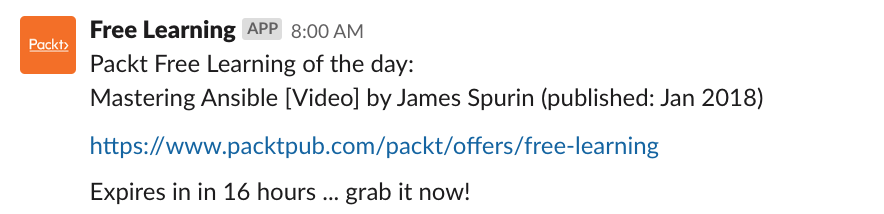
And this in our #books Slack channel:
Conclusion
This was a fun exercise! Not only did it solve a pressing need of keeping our Slack community up2date about Packt’s awesome deal, along the way I learned:
- how to scrape “hidden” HTML,
- how to work with Selenium in headless mode,
- auto-post to Twitter and Slack using their APIs,
- and deploy my script to Heroku using its Scheduler addon to run it automatically every day.
That’s the part I like most: as long as the page source does not update again, I can forget about it 🙂
Our Slack
I hope you enjoyed this post and feel free to get notified joining our #books channel on our Slack.
While there feel free to share inspiring books you came across that helped you grow as a developer and human being (you can also use our Django app).
It’s a super nice community filled with passionate Pythonistas learning and sharing everything Python / coding related …
Keep Calm and Code in Python!
— Bob